As a consumer-based nonlinear video editing software designed for the PC, Sony Movie Studio makes it easy to import and edit movies, images and music for creating your next video or audio masterpiece. But the problem is, when you plan to edit the MP4 file with Sony Movie Studio, it's failed even MP4 is a listed supported format by Sony Movie Studio Platinum 13. So what's the matter? How to import MP4 files to Sony Movie Studio flawlessly?
 In fact, Sony Movie Studio Platinum 13 may not work with some MP4 files, that probably caused by the unsupported codec or other reasons. To fix the problem, a more practical way recommended online is to transcode MP4 to a more editing-friendly format for Sony Movie Studio. Once you have, you can add them to Sony Movie Studio (Platinum 13) and use MP4 like any other file Sony Movie Studio supports. After testing, Dimo Video Converter Ultimate was found to be an easy-to-use yet powerful high-quality MP4 video converter, player and editor. By running it, there is no need to to set the codec yourself, the program has an optimized preset for Sony Vegas.
Besides that, it not only can handle MP4 files to be compatible with Sony Movie Studio (or other NLEs on PC, like Windows Movie Maker, Premiere Pro, After Effect CC, Davinci, GoPro Studio, FCP, Avid MC, etc) quickly and easily, but also offers some cool video editing features like cropping, rotating, cutting, adjusting effects, adding watermark, and so on. Now download to start MP4 to Sony Movie Studio Platinum 13 conversion.
In fact, Sony Movie Studio Platinum 13 may not work with some MP4 files, that probably caused by the unsupported codec or other reasons. To fix the problem, a more practical way recommended online is to transcode MP4 to a more editing-friendly format for Sony Movie Studio. Once you have, you can add them to Sony Movie Studio (Platinum 13) and use MP4 like any other file Sony Movie Studio supports. After testing, Dimo Video Converter Ultimate was found to be an easy-to-use yet powerful high-quality MP4 video converter, player and editor. By running it, there is no need to to set the codec yourself, the program has an optimized preset for Sony Vegas.
Besides that, it not only can handle MP4 files to be compatible with Sony Movie Studio (or other NLEs on PC, like Windows Movie Maker, Premiere Pro, After Effect CC, Davinci, GoPro Studio, FCP, Avid MC, etc) quickly and easily, but also offers some cool video editing features like cropping, rotating, cutting, adjusting effects, adding watermark, and so on. Now download to start MP4 to Sony Movie Studio Platinum 13 conversion.
Free Download Dimo Video Converter Ultimate (Win/Mac):

 How to Convert MP4 to Sony Movie Studio more compatible file formats?
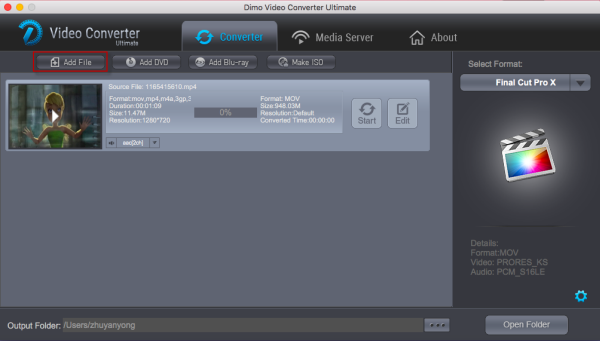
Step 1 Add MP4 file to Sony Movie Studio converter
Load MP4 files to this Sony Movie Studio Converter program by clicking "Add File" button, or drag the MP4 videos to the software directly.
Step 2 Choose output compatible format
Click "Select Format" bar and choose "Format" > "Editor" > "Sony Vegas" as output format on the drop-down menu. Or AVI, WMV as output video format from "Format > Video" Category. In addition, to import high definition MP4 video like 1080p, 720p to Sony Vega, select WMV HD, AVI HD from "HD Video" Category.
How to Convert MP4 to Sony Movie Studio more compatible file formats?
Step 1 Add MP4 file to Sony Movie Studio converter
Load MP4 files to this Sony Movie Studio Converter program by clicking "Add File" button, or drag the MP4 videos to the software directly.
Step 2 Choose output compatible format
Click "Select Format" bar and choose "Format" > "Editor" > "Sony Vegas" as output format on the drop-down menu. Or AVI, WMV as output video format from "Format > Video" Category. In addition, to import high definition MP4 video like 1080p, 720p to Sony Vega, select WMV HD, AVI HD from "HD Video" Category.
 Tip: Before conversion, you can click the "Setting" to customize the video/audio settings Bitrate of Video and Audio, the Codec of Video and Audio, Video Size, Sample Rate, Frame Rate, Audio Channels, etc. for Sony Movie Studio.
Step 3 Convert MP4 to Sony Movie Studio Platinum 13 compatible video
Click the "Start" button under the main interface, and the program will start transcode MP4 to MPEG-2, MP4, WMV, AVI or DV, which is compatible for Sony Movie Studio Platinum 13.
Afterward, you can find the converted file on your computer by clicking the "Open" button within several minutes. And then you can import the converted MP4 files to Sony Vegas Movie Studio Platinum 13 easily.
Related Software:
Videomate (Win/Mac)
An all-around video converter software program that enables you to convert various video and audio files to formats that are supported by most multimedia devices.
BDmate (Win/Mac)
Lossless backup Blu-ray to MKV with all audio and subtitle tracks; Rip Blu-ray to multi-track MP4; ConvertBlu-ray to almost all popular video/audio formats and devices; Copy Blu-ray to ISO/M2TS; Share digitized Blu-ray wirelessly.
DVDmate (Win/Mac)
A professional DVD ripping and editing tool with strong ability to remove DVD protection, transcode DVD to any video and audio format, and edit DVD to create personal movie.
8K Player (Win/Mac)
A mixture of free HD/4K video player, music player, Blu-ray/DVD player, video recorder and gif maker.
Free Download or Purchase Dimo Video Converter Ultimate:
Tip: Before conversion, you can click the "Setting" to customize the video/audio settings Bitrate of Video and Audio, the Codec of Video and Audio, Video Size, Sample Rate, Frame Rate, Audio Channels, etc. for Sony Movie Studio.
Step 3 Convert MP4 to Sony Movie Studio Platinum 13 compatible video
Click the "Start" button under the main interface, and the program will start transcode MP4 to MPEG-2, MP4, WMV, AVI or DV, which is compatible for Sony Movie Studio Platinum 13.
Afterward, you can find the converted file on your computer by clicking the "Open" button within several minutes. And then you can import the converted MP4 files to Sony Vegas Movie Studio Platinum 13 easily.
Related Software:
Videomate (Win/Mac)
An all-around video converter software program that enables you to convert various video and audio files to formats that are supported by most multimedia devices.
BDmate (Win/Mac)
Lossless backup Blu-ray to MKV with all audio and subtitle tracks; Rip Blu-ray to multi-track MP4; ConvertBlu-ray to almost all popular video/audio formats and devices; Copy Blu-ray to ISO/M2TS; Share digitized Blu-ray wirelessly.
DVDmate (Win/Mac)
A professional DVD ripping and editing tool with strong ability to remove DVD protection, transcode DVD to any video and audio format, and edit DVD to create personal movie.
8K Player (Win/Mac)
A mixture of free HD/4K video player, music player, Blu-ray/DVD player, video recorder and gif maker.
Free Download or Purchase Dimo Video Converter Ultimate:


 Kindly Note:
The price of Dimo Video Converter Ultimate for Windows is divided into 1 Year Subscription, Lifetime/Family/Business License: $43.95/Year; $45.95/lifetime license; $95.95/family license(2-4 PCs); $189.95/business pack(5-8 PCs). Get your needed one at purchase page.
Contact us or leave a message at Facebook if you have any trouble to import MP4 files or others to Sony Movie Studio Platinum.
Related Articles:
Source From: Why Sony Movie Studio Platinum 13 Won’t Import MP4?
Kindly Note:
The price of Dimo Video Converter Ultimate for Windows is divided into 1 Year Subscription, Lifetime/Family/Business License: $43.95/Year; $45.95/lifetime license; $95.95/family license(2-4 PCs); $189.95/business pack(5-8 PCs). Get your needed one at purchase page.
Contact us or leave a message at Facebook if you have any trouble to import MP4 files or others to Sony Movie Studio Platinum.
Related Articles:
Source From: Why Sony Movie Studio Platinum 13 Won’t Import MP4?
As 4K-resolution cameras falling into consumers' hands, such as BlackMagic Design Production Camera, Leica D-LUX, Panasonic LUMIX DMC-GH4K/FZ1000, Sony Alpha a7S, GoPro Hero4 Black, Canon EOS 1D-C, etc. In this situation, if you recorded some 4K videos with your 4K camcorder, you may prefer to edit them before sharing with friends or uploading to YouTube or 4K TV. Then the question arises. Will editing programs like Premiere Pro CC support 4K videos?
 Granted, Premiere Pro CC 7 (2017 included), CS6 can handle (usually) 4K files without much problem, but it is extremely hardware intensive. You probably don't like to invest a new computer, that means dead end? Humh, of course not, but you do need to transcode 4K video to Premiere Pro using MPEG-2 (1080p) as primary delivery format. Here we will discuss how to edit 4K footage with Premiere Pro without bogging down your computer.
How to import and edit 4K video in Premerie Pro CC successfully?
To get a best solution for 4K video and finish the 4K video conversion task, the best Mac 4K video converter app,Dimo Video Converter Ultimate for Mac, is your best choice to transcode DJI, Nikon, Sony, Blackmagic, GoPro, Panasonic, Canon 4K video to Premerie Pro CC codec. With it, you can effortlessly transcode transcode 4K video, H.264(MP4), XAVC, XAVC S, etc footage to MPEG-2 for Premiere Pro.
What's more, it supports converting 4K files to various non-linear editing systems (NLE), including Avid Media Composer, Final Cut Pro, Camtasia Studio and more. If you work 4K files in Adobe Premiere Pro on Windows PC, please get Dimo Video Converter Ultimate to solve the issues.
Granted, Premiere Pro CC 7 (2017 included), CS6 can handle (usually) 4K files without much problem, but it is extremely hardware intensive. You probably don't like to invest a new computer, that means dead end? Humh, of course not, but you do need to transcode 4K video to Premiere Pro using MPEG-2 (1080p) as primary delivery format. Here we will discuss how to edit 4K footage with Premiere Pro without bogging down your computer.
How to import and edit 4K video in Premerie Pro CC successfully?
To get a best solution for 4K video and finish the 4K video conversion task, the best Mac 4K video converter app,Dimo Video Converter Ultimate for Mac, is your best choice to transcode DJI, Nikon, Sony, Blackmagic, GoPro, Panasonic, Canon 4K video to Premerie Pro CC codec. With it, you can effortlessly transcode transcode 4K video, H.264(MP4), XAVC, XAVC S, etc footage to MPEG-2 for Premiere Pro.
What's more, it supports converting 4K files to various non-linear editing systems (NLE), including Avid Media Composer, Final Cut Pro, Camtasia Studio and more. If you work 4K files in Adobe Premiere Pro on Windows PC, please get Dimo Video Converter Ultimate to solve the issues.
Free Download Dimo Video Converter Ultimate for Mac/Win:
Convert 4K video files for Adobe Premiere Pro CS6/CC/CS6/CS5/CS4
Step 1. Load 4K Files
Run the program you just install, and drag and drop the 4K video files to the 4K converter. You can also hit "Add File" button to import videos to the app.
Step 2. Choose output format
Click "Select Format" bar and choose "Format" > "Editor" > "Adobe Premiere" as output format for editing 4K in Adobe with natively supported video codec.
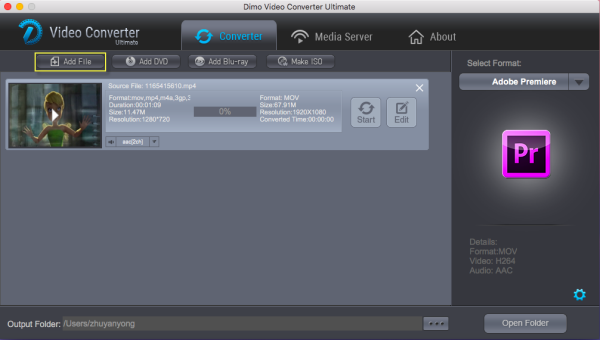 Tips: Click "Setting" button if you'd like to customize advanced audio and video parameters like Video Codec, aspect ratio, bit rate, frame rate, Audio codec, sample rate, audio channels. However, please keep it default as original if you want to get original 4K resolution.
Step 3. Start converting 4K files
Tab the "Start" button of this fastest 4K Video Converter. It will start to transcode 4K for importing to Adobe Premiere Pro immediately. Soon after the conversion, just click "Open" button to get the generated files for natively editing in Premiere Pro CC 2017 as well as CC7/CS6/CS5/CS4/CS3 perfectly.
Other tips to get best Premiere Pro CC Settings:
1. Disable High-Quality Playback, gets you apx. 5-10% performance (Player Window/Wrench Icon/High Qaulity Playback).
INFO: Mercury Engine Transmit to second monitor, takes away apx. 5-10% performance (Player Window/Wrench Icon/Enable Transmit).
2. RedCode/Cineform movie files: Set playback resolution to 1/2 or 1/4 size will increase performace apx. 10-20% (Player Window/Full-1/2-1/4,etc.)
3. Increase Playback Preroll and Postroll time to 3-8 seconds for smoother playback, especially with slower harddrives (Edit/Preferences/Playback/Preroll-Postroll).
4. Disable Lumetri Scopes if not needed. They have been optimized in PP 2015.3 but you loose 3-8% performance when enabled (Window/Lumetri Scopes).
Tips: Click "Setting" button if you'd like to customize advanced audio and video parameters like Video Codec, aspect ratio, bit rate, frame rate, Audio codec, sample rate, audio channels. However, please keep it default as original if you want to get original 4K resolution.
Step 3. Start converting 4K files
Tab the "Start" button of this fastest 4K Video Converter. It will start to transcode 4K for importing to Adobe Premiere Pro immediately. Soon after the conversion, just click "Open" button to get the generated files for natively editing in Premiere Pro CC 2017 as well as CC7/CS6/CS5/CS4/CS3 perfectly.
Other tips to get best Premiere Pro CC Settings:
1. Disable High-Quality Playback, gets you apx. 5-10% performance (Player Window/Wrench Icon/High Qaulity Playback).
INFO: Mercury Engine Transmit to second monitor, takes away apx. 5-10% performance (Player Window/Wrench Icon/Enable Transmit).
2. RedCode/Cineform movie files: Set playback resolution to 1/2 or 1/4 size will increase performace apx. 10-20% (Player Window/Full-1/2-1/4,etc.)
3. Increase Playback Preroll and Postroll time to 3-8 seconds for smoother playback, especially with slower harddrives (Edit/Preferences/Playback/Preroll-Postroll).
4. Disable Lumetri Scopes if not needed. They have been optimized in PP 2015.3 but you loose 3-8% performance when enabled (Window/Lumetri Scopes).
Free Download or Purchase Dimo Video Converter Ultimate for Mac/Win:


Kindly Note:
The price of Dimo Video Converter Ultimate for Mac is divided into 1 Year Subscription, Lifetime/Family/Business License: $43.95/Year; $45.95/lifetime license; $95.95/family license(2-4 Macs); $189.95/business pack(5-8 Macs). Get your needed one at purchase page.
Contact us or leave a message at Facebook if you have any issues of importing 4K to Premiere Pro CC.
More Articles:
Source From: Tips for importing and editing 4K videos in Premiere Pro CC
FFmpeg is a fantastic open source tool to convert, stream audio and video. While, there are some FFmpeg errors frequently reported by users, which makes it difficult for FFmpeg to snag the top spot in the industry. For example, FFmpeg can not handle H.265/HEVC well: crashed; so long time conversion… In a case like this, a great FFmpeg alternative to encode H.265/HEVC videos is strongly needed.
 If you haven't got an ideal one, you can get Dimo Video Converter Ultimate to have a try. It is an all-in-one H.265 decoder, encoder, converter, editor, player and media server. It allows people to convert or downscale 4K videoswith H.265/HEVC to common video files including H.264, MPEG-4, MPEG-2, DivX, XviD, WMV, MKV... without quality loss. Plus, with it you can fast convert non-H.265 videos to H.265 seamlessly. Apart from that, its built-in editor can help users to do some basic editing work before conversion, like trimming, cutting, adding audio information/watermark etc.
Better than FFmepg, the faster and versatile FFmpeg alternative can fast share videos, movies and TV shows from computer to any device wirelessly once they are connected to the same network. It's easy to use, 100% clean, no ads, no plugin, no spam. If you are a Mac(OS Sierra) user, please turn to Dimo Video Converter Ultimate for Mac. Download the alternative to FFmpeg and start encoding H.265 videos.
If you haven't got an ideal one, you can get Dimo Video Converter Ultimate to have a try. It is an all-in-one H.265 decoder, encoder, converter, editor, player and media server. It allows people to convert or downscale 4K videoswith H.265/HEVC to common video files including H.264, MPEG-4, MPEG-2, DivX, XviD, WMV, MKV... without quality loss. Plus, with it you can fast convert non-H.265 videos to H.265 seamlessly. Apart from that, its built-in editor can help users to do some basic editing work before conversion, like trimming, cutting, adding audio information/watermark etc.
Better than FFmepg, the faster and versatile FFmpeg alternative can fast share videos, movies and TV shows from computer to any device wirelessly once they are connected to the same network. It's easy to use, 100% clean, no ads, no plugin, no spam. If you are a Mac(OS Sierra) user, please turn to Dimo Video Converter Ultimate for Mac. Download the alternative to FFmpeg and start encoding H.265 videos.
Free Download Dimo Video Converter Ultimate (Win/Mac):
How to use FFMPEG Alternative to Convert H.265/HEVC videos
1. Import H.265 files
Launch Dimo Video Converter Ultimate first. To import the local videos you want, you can click the "Add file" button. A pop-up window will lead you to locate your local files. Or you can directly drag the videos you want from your PC to this program.
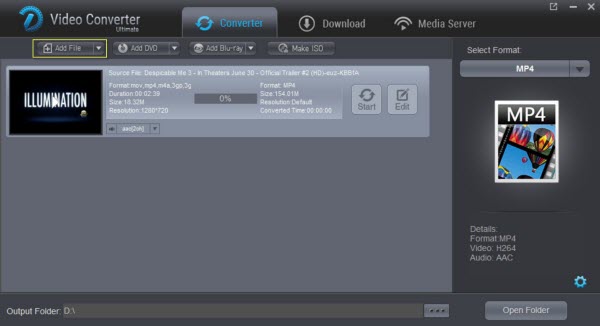 2. Select output format you want
Click the "Select Format" icon, and then go to the right category to find the video format you want. As you can see, various video formats like MP4, MOV, MKV, FLV, WMV, AVI, etc. are provided. You can also choose the icon of iPhone, iPad, iPod, Samsung, Android, TV, VR, YouTube, Facebook, Sony Vegas, Windows Movie Maker, etc. to get videos with best settings for the selected device/software.
2. Select output format you want
Click the "Select Format" icon, and then go to the right category to find the video format you want. As you can see, various video formats like MP4, MOV, MKV, FLV, WMV, AVI, etc. are provided. You can also choose the icon of iPhone, iPad, iPod, Samsung, Android, TV, VR, YouTube, Facebook, Sony Vegas, Windows Movie Maker, etc. to get videos with best settings for the selected device/software.
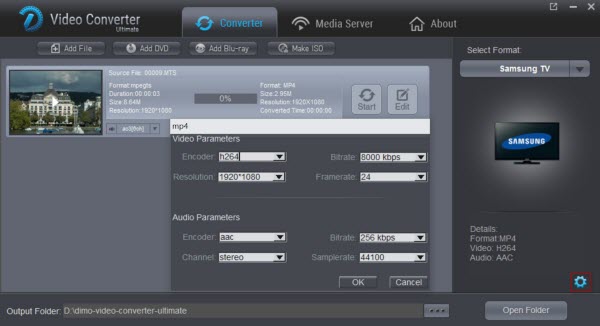
 Tip: If you want to customize the output video quality, you can click the "Settings" button to open the Settings window and set video resolution, frame rate, bit rate, codec, etc.
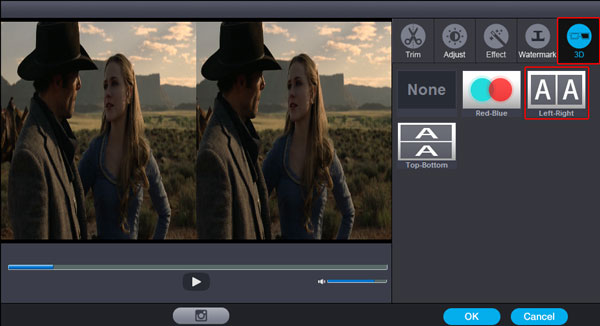
 3. Edit your video files with an alternative FFMPEG (optional)
If necessary, you can perhaps try to edit your video files with the video converter Mac. Nothing unfamiliar from the FFMPEG, you can also easily cut and trim your videos. In addition to that, you can add effects to your video clips together with the insertion of watermarks as well as create 3D videos.
3. Edit your video files with an alternative FFMPEG (optional)
If necessary, you can perhaps try to edit your video files with the video converter Mac. Nothing unfamiliar from the FFMPEG, you can also easily cut and trim your videos. In addition to that, you can add effects to your video clips together with the insertion of watermarks as well as create 3D videos.
 4. Start H.265 video conversion
Click the "Start" button to start converting H.265 videos under Windows (10) or Mac(OS Sierra). You can follow the conversion process. Once the task bar shows in 100%, just click Open button to locate the output files. Hence, you can now transfer and play your H.265 video files anywhere and anytime you like it.
External Knowledge: Other FFmpeg Alternatives
1. x265
x2645 is a good FFmpeg alternative, worth a download. The free alternative to FFmpeg developed by VideoLAN is designed as a H.265 video converter to encode video streams to H.265/MPEG-H HEVC compression format. It works great for HD 4K UHD H.265 video conversion.
2. avconv
avconv is a faster video and audio converter. Cross-platform avconv can convert between arbitrary sample rates and resize video audio file in a simple way.
3. MEncoder
MPlayer media player uses MEncoder to transcode audio and video stream. The FFmpeg alternative can convert all the video audio formats that MPlayer reads to various formats in different codecs without decreasing much video image quality.
Verdict: Among all the FFmpeg alternatives, Dimo Video Converter Ultimate delivers the fastest performances, outputs the highest quality, and boasts more features than FFmpeg or other similar FFmpeg programs do. avconv, x265, MEncoder are the open source tools closest to FFmpeg. Its basic video editing options give itself some advantages over other FFmpeg alternatives. avconv is FFmpeg alternative faster than FFmpeg, while x265 is mainly used to encode H.265 video when FFmpeg fails to convert H.265 video, and MEncoder is the best if you have MPlayer media player installed.
Free Download or Purchase Dimo Video Converter Ultimate:
Kindly Note:
The price of Dimo Video Converter Ultimate for Windows is divided into 1 Year Subscription, Lifetime/Family/Business License: $43.95/Year; $45.95/lifetime license; $95.95/family license(2-4 PCs); $189.95/business pack(5-8 PCs). Get your needed one at purchase page.
Contact us or leave a message at Facebook if you have any issues.
Related Articles:
Source: Best FFMPEG Alternative to Encode H.265/HEVC
4. Start H.265 video conversion
Click the "Start" button to start converting H.265 videos under Windows (10) or Mac(OS Sierra). You can follow the conversion process. Once the task bar shows in 100%, just click Open button to locate the output files. Hence, you can now transfer and play your H.265 video files anywhere and anytime you like it.
External Knowledge: Other FFmpeg Alternatives
1. x265
x2645 is a good FFmpeg alternative, worth a download. The free alternative to FFmpeg developed by VideoLAN is designed as a H.265 video converter to encode video streams to H.265/MPEG-H HEVC compression format. It works great for HD 4K UHD H.265 video conversion.
2. avconv
avconv is a faster video and audio converter. Cross-platform avconv can convert between arbitrary sample rates and resize video audio file in a simple way.
3. MEncoder
MPlayer media player uses MEncoder to transcode audio and video stream. The FFmpeg alternative can convert all the video audio formats that MPlayer reads to various formats in different codecs without decreasing much video image quality.
Verdict: Among all the FFmpeg alternatives, Dimo Video Converter Ultimate delivers the fastest performances, outputs the highest quality, and boasts more features than FFmpeg or other similar FFmpeg programs do. avconv, x265, MEncoder are the open source tools closest to FFmpeg. Its basic video editing options give itself some advantages over other FFmpeg alternatives. avconv is FFmpeg alternative faster than FFmpeg, while x265 is mainly used to encode H.265 video when FFmpeg fails to convert H.265 video, and MEncoder is the best if you have MPlayer media player installed.
Free Download or Purchase Dimo Video Converter Ultimate:
Kindly Note:
The price of Dimo Video Converter Ultimate for Windows is divided into 1 Year Subscription, Lifetime/Family/Business License: $43.95/Year; $45.95/lifetime license; $95.95/family license(2-4 PCs); $189.95/business pack(5-8 PCs). Get your needed one at purchase page.
Contact us or leave a message at Facebook if you have any issues.
Related Articles:
Source: Best FFMPEG Alternative to Encode H.265/HEVC
The Canon 5D Mark IV is the world's most universally useful DSLR. It is competitive for both sports and action as well as for wedding, nature, portrait, landscape and product photography. Got some 4096×2160 Digital Cinema Initiative 4K video from a 5D Mark IV? Looks amazing, but it makes the video editing in Mac editors like Avid Media Composer a real nightmare.
 I’m trying to import the 4K files from 5D Mark IV to Avid Media Composer to make a project, but my Avid MC 7 won't read the 4K files.
Please note, in order to work within a 4K project in Avid MC, you must have Avid Media Composer 8.3 or higher. See 4K Workflow with Avid Media Composer here. But unluckily, still some users have "Canon 5D Mark IV 4K to Avid MC Importing Issues" after update. Why?
Although Media Composer has already had 4K and "high-resolution" (i.e., higher-than-4K) support via Avid Media Access (AMA) in previous versions and now the Canon 5D Mark IV 4K to Avid Media Composer workflow has been even improved in Media Composer 8. Whereas, there's actually no way to edit Canon 5K Mark IV 4K project natively with Avid MC. In most cases, editing 4K raw in Avid Media Composer is very taxing on your computer.
Scout the internet, I got some clues. An ultimate solution we found would be to transcode/compress 4K to DNxHD for Avid Media Composer. Different from 720p/1080p videos, the conversion of 4K video is in a higher standard, a professional 4K Video Converter for Mac is what you need.
And here Dimo Video Converter Ultimate for Mac can help you finish the task easily and quickly. This Mac video converter provides the most reliable and professional 4K solutions to all format issues including 4K M-JPEG, MP4, 4K MOV, 4K MXF, 4K XAVC/XAVC S and more. With it, you can transcode Canon 5D MK IV MP4/MOV or 4K M-JPEG to Avid Media Composer editable DNxHD codec with fast speed while retaining excellent quality.
It also comes with other optimal presets like Apple ProRes for Final Cut Pro, MPEG-2 for Adobe Premiere, MP4 for iPhone, etc to satisfy your diverse demands. More than that, this 4K converter is also available to customize the output resolutions to any size like 1080p, 2K, 4K as users want. If you are working on Windows(Windows 10 included), please turn to Dimo Video Converter Ultimate. Download the tool and start the Canon 5D MK IV 4K to Avid video conversion.
I’m trying to import the 4K files from 5D Mark IV to Avid Media Composer to make a project, but my Avid MC 7 won't read the 4K files.
Please note, in order to work within a 4K project in Avid MC, you must have Avid Media Composer 8.3 or higher. See 4K Workflow with Avid Media Composer here. But unluckily, still some users have "Canon 5D Mark IV 4K to Avid MC Importing Issues" after update. Why?
Although Media Composer has already had 4K and "high-resolution" (i.e., higher-than-4K) support via Avid Media Access (AMA) in previous versions and now the Canon 5D Mark IV 4K to Avid Media Composer workflow has been even improved in Media Composer 8. Whereas, there's actually no way to edit Canon 5K Mark IV 4K project natively with Avid MC. In most cases, editing 4K raw in Avid Media Composer is very taxing on your computer.
Scout the internet, I got some clues. An ultimate solution we found would be to transcode/compress 4K to DNxHD for Avid Media Composer. Different from 720p/1080p videos, the conversion of 4K video is in a higher standard, a professional 4K Video Converter for Mac is what you need.
And here Dimo Video Converter Ultimate for Mac can help you finish the task easily and quickly. This Mac video converter provides the most reliable and professional 4K solutions to all format issues including 4K M-JPEG, MP4, 4K MOV, 4K MXF, 4K XAVC/XAVC S and more. With it, you can transcode Canon 5D MK IV MP4/MOV or 4K M-JPEG to Avid Media Composer editable DNxHD codec with fast speed while retaining excellent quality.
It also comes with other optimal presets like Apple ProRes for Final Cut Pro, MPEG-2 for Adobe Premiere, MP4 for iPhone, etc to satisfy your diverse demands. More than that, this 4K converter is also available to customize the output resolutions to any size like 1080p, 2K, 4K as users want. If you are working on Windows(Windows 10 included), please turn to Dimo Video Converter Ultimate. Download the tool and start the Canon 5D MK IV 4K to Avid video conversion.
Free Download Dimo Video Converter Ultimate for Mac/Win:
Convert Canon 5D Mark IV 4K footage for Editing in Avid Media Composer
Step 1. Run the 4K video converter program you just set up. You can hit "Add File" button to import the 4K video files from 5D Mark IV to the converter.
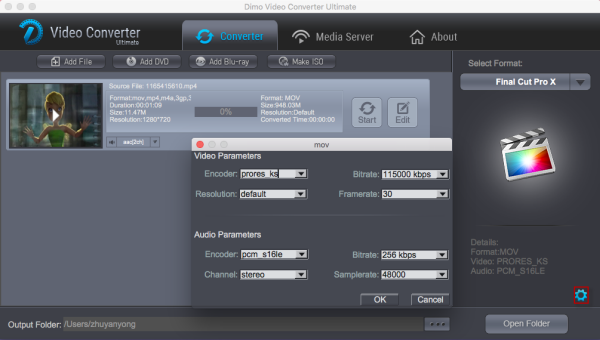
Step 2. To edit Canon 5D Mark IV 4K video in Avid MC, you are recommended to choose "Format -> Editor -> DNxHD 720P or DNxHD 1080P" as the target format.
 Step 3. If you'd like to customize advanced audio and video parameters like Video Codec, aspect ratio, bit rate, frame rate, Audio codec, sample rate, audio channels, please turn to "Settings" page. Usually 1080p is the optimal setting for using in Avid MC. You can downscale 5D MK 4 4K to 1080p.
 Step 4. Hit the "Start" button to start converting Canon 5D Mark IV 4K for importing to Avid Media Composer with smooth editing. After editing, you share your editing work on YouTube or mobile devices with your friends or family.
Free Download or Purchase Dimo Video Converter Ultimate for Mac/Win:
Kindly Note:
The price of Dimo Video Converter Ultimate for Mac is divided into 1 Year Subscription, Lifetime/Family/Business License: $43.95/Year; $45.95/lifetime license; $95.95/family license(2-4 Macs); $189.95/business pack(5-8 Macs). Get your needed one at purchase page.
Step 4. Hit the "Start" button to start converting Canon 5D Mark IV 4K for importing to Avid Media Composer with smooth editing. After editing, you share your editing work on YouTube or mobile devices with your friends or family.
Free Download or Purchase Dimo Video Converter Ultimate for Mac/Win:
Kindly Note:
The price of Dimo Video Converter Ultimate for Mac is divided into 1 Year Subscription, Lifetime/Family/Business License: $43.95/Year; $45.95/lifetime license; $95.95/family license(2-4 Macs); $189.95/business pack(5-8 Macs). Get your needed one at purchase page.
Contact us or leave a message at Facebook if you have any issues.
Related Articles:
Roughly seven months after the EOS-1D X Mark II's introduction, the 5D Mark IV became Canon's third DSLR to feature 4K video recording and their second full frame camera with a Dual Pixel CMOS sensor. Higher resolution video recording (like 4K) makes accurate, smooth focusing more important than ever. If you record some 4K videos from Canon 5D Mark IV, things would be a little more complicated when you work with the 4K files in Final Cut Pro.
 From Apple official site, we know that FCP X can support editing and monitoring 4K video, including 4K ProRes, Sony XAVC and REDCODE RAW from version 10.1. But the point here is, Final Cut Pro 7 still uses 1080p as primary delivery format and will continue to do so for a long time. Besides, you should make sure your Mac meet the mini requirements to edit 4K video, if not, it would be much ideal for you to create a proxy file format with smaller file resolution for editing with Final Cut Pro X. Thus, to import and edit Canon 5D Mark IV 4K clips in FCP 7/X smoothly, you are advised to convert and downscale 4K to 1080p from 5D Mark IV for Final Cut Pro before editing.
That's why I vote for Dimo Video Converter Ultimate for Mac, an effective and efficient 4K to FCP Converter. Without rendering time, the program can utilize all cores to achieve 6X faster conversion speed. Thanks to the advanced video/audio encoding technology, this Canon 5D Mark IV video converter also makes sure that the quality is preserved and the user gets the same view as well as the results when it comes to the conversion.
Plus, a highlight is that the program supports various video codec for editors/players/servers/devices/online websites. With it, you can effortlessly encode/re-encode Canon 5D Mark IV 4K footage for smoothly importing and editing in various non-linear editing systems (NLE), including Final Cut Pro, Adobe Premiere Pro, Avid Media Composeror playing on QuickTime, iTunes, Windows Media Player, VLC, 4K Smart TV, Tablet, Smartphone, PS4 Pro, PS3, Xbox One S, Wii, WDTV, Roku, etc., even sharing to Youtube, Vimeo, Facebook, etc. Windows version is here.
More than dealing with 5D MK 4 recordings, you can also use it to handle H.264 MOV footage shot by Canon EOS 5D Mark III/Mark II, 550D(Rebel T2i), Canon EOS 650D(Rebel T4i), EOS 700D(Rebel T5i) and more. Download the top 4K video converter on Mac and follow the tutorial.
From Apple official site, we know that FCP X can support editing and monitoring 4K video, including 4K ProRes, Sony XAVC and REDCODE RAW from version 10.1. But the point here is, Final Cut Pro 7 still uses 1080p as primary delivery format and will continue to do so for a long time. Besides, you should make sure your Mac meet the mini requirements to edit 4K video, if not, it would be much ideal for you to create a proxy file format with smaller file resolution for editing with Final Cut Pro X. Thus, to import and edit Canon 5D Mark IV 4K clips in FCP 7/X smoothly, you are advised to convert and downscale 4K to 1080p from 5D Mark IV for Final Cut Pro before editing.
That's why I vote for Dimo Video Converter Ultimate for Mac, an effective and efficient 4K to FCP Converter. Without rendering time, the program can utilize all cores to achieve 6X faster conversion speed. Thanks to the advanced video/audio encoding technology, this Canon 5D Mark IV video converter also makes sure that the quality is preserved and the user gets the same view as well as the results when it comes to the conversion.
Plus, a highlight is that the program supports various video codec for editors/players/servers/devices/online websites. With it, you can effortlessly encode/re-encode Canon 5D Mark IV 4K footage for smoothly importing and editing in various non-linear editing systems (NLE), including Final Cut Pro, Adobe Premiere Pro, Avid Media Composeror playing on QuickTime, iTunes, Windows Media Player, VLC, 4K Smart TV, Tablet, Smartphone, PS4 Pro, PS3, Xbox One S, Wii, WDTV, Roku, etc., even sharing to Youtube, Vimeo, Facebook, etc. Windows version is here.
More than dealing with 5D MK 4 recordings, you can also use it to handle H.264 MOV footage shot by Canon EOS 5D Mark III/Mark II, 550D(Rebel T2i), Canon EOS 650D(Rebel T4i), EOS 700D(Rebel T5i) and more. Download the top 4K video converter on Mac and follow the tutorial.
Free Download Dimo Video Converter Ultimate for Mac/Win:
How to Convert Canon 5D Mark IV video files to work in FCP
Note: If you are FCP X users, before you try to do the conversion, don't forget to make sure that you have installed the Apple ProRes Codec manually since the FCP X asks users to install it by themselves.
Step 1: Load the 4K videos to the program
Install and run the 4K Video Converter, and then import the source 4K videos to it. To do so, you can directly drag & drop the files onto the main interface, or you can click the "Add File" icon to locate the videos from your local disk.
 Step 2: Set output video format
Click the "Select Format" bar and select "Format > Editor > Final Cut Pro 7 or Final Cut Pro X" as output format.
Tip: Click the "Settings" button and customize proper video/audio parameters including Video size, bitrate and fame rate and more. Usually 1920*1080 video size and 30fps video frame rate are recommended for FCP 7/X editing. Besides, in order to split videos beyond the size limitation while uploading to website, please click the "Edit > Trim" button
Step 2: Set output video format
Click the "Select Format" bar and select "Format > Editor > Final Cut Pro 7 or Final Cut Pro X" as output format.
Tip: Click the "Settings" button and customize proper video/audio parameters including Video size, bitrate and fame rate and more. Usually 1920*1080 video size and 30fps video frame rate are recommended for FCP 7/X editing. Besides, in order to split videos beyond the size limitation while uploading to website, please click the "Edit > Trim" button
 Step 3: Begin to convert Canon 5D Mark IV 4K videos
When you finish the settings, you can press the big "Start" button to kick off the 4K to Prores conversion. By using this professional 4K to FCP Converter, the conversion will be finished with ultrafast speed and the best video quality kept. After the conversion, you can then edit Canon 5D Mark IV raw 4K in Final Cut Pro 7/X smoothly. After editing, you can freely share edited videos on mobile devices or online websites like YouTube.
Step 3: Begin to convert Canon 5D Mark IV 4K videos
When you finish the settings, you can press the big "Start" button to kick off the 4K to Prores conversion. By using this professional 4K to FCP Converter, the conversion will be finished with ultrafast speed and the best video quality kept. After the conversion, you can then edit Canon 5D Mark IV raw 4K in Final Cut Pro 7/X smoothly. After editing, you can freely share edited videos on mobile devices or online websites like YouTube.
Free Download or Purchase Dimo Video Converter Ultimate for Mac/Win:
Kindly Note:
The price of Dimo Video Converter Ultimate for Mac is divided into 1 Year Subscription, Lifetime/Family/Business License: $43.95/Year; $45.95/lifetime license; $95.95/family license(2-4 Macs); $189.95/business pack(5-8 Macs). Get your needed one at purchase page.
Contact us or leave a message at Facebook if you have any issues.
Related Articles:
Source: Import Canon 5D Mark IV 4K files to FCP 7/X without rendering
Camtasia Studio is professional screen recording and video editing software on Windows/Mac computer. It can merge, split, trim, crop, edit and create videos to share with others. Even though Camtasia Studio has been upgraded to 9.0.0 two months ago, users still fail to import videos to Camtasia Studio like MKV which are downloaded from Internet, because of MKV incompatibility with Camtasia. So how can you make .mkv files editable in Camtasia Studio (9, 8)?
 How to get MKV Videos Imported by Camtasia Studio?
According to Techsmith support website, Camtasia Studio supports AVI, .WMV, MPEG-1, .MP3, .WAV, .WMA, MP4, MTS/M2TS and .MOV (QuickTime) files. In order to import MKV files to Camtasia Studio, it is necessary to ask how to convert MKV to formats like MOV, MPEG-1, etc. which are supported by Camtasia. Along with some help from third-party video converter software, it can be done effortlessly.
To do that, you can use Dimo Video Converter Ultimate, this software can deal with almost all kinds of MKV videos. With it, users can effortlessly transcode (SD/HD/4K, H.264/H.265, 2D/3D) MKV files for smoothly editing in Camtasia Studio. What's more, it can generates more optimal editing formats/codecs for you to use in different NLE apps, such as Adobe Premiere Pro, Sony Vegas, Avid Media Composer, Windows Movie Maker and more.
For Mac users, please get Dimo Video Converter Ultimate for Mac. If you're interested in doing likewise, check out the guide below to transcode MKV files to Camtasia Studio natively supported formats so that you can make engaging movies with your MKV clips.
How to get MKV Videos Imported by Camtasia Studio?
According to Techsmith support website, Camtasia Studio supports AVI, .WMV, MPEG-1, .MP3, .WAV, .WMA, MP4, MTS/M2TS and .MOV (QuickTime) files. In order to import MKV files to Camtasia Studio, it is necessary to ask how to convert MKV to formats like MOV, MPEG-1, etc. which are supported by Camtasia. Along with some help from third-party video converter software, it can be done effortlessly.
To do that, you can use Dimo Video Converter Ultimate, this software can deal with almost all kinds of MKV videos. With it, users can effortlessly transcode (SD/HD/4K, H.264/H.265, 2D/3D) MKV files for smoothly editing in Camtasia Studio. What's more, it can generates more optimal editing formats/codecs for you to use in different NLE apps, such as Adobe Premiere Pro, Sony Vegas, Avid Media Composer, Windows Movie Maker and more.
For Mac users, please get Dimo Video Converter Ultimate for Mac. If you're interested in doing likewise, check out the guide below to transcode MKV files to Camtasia Studio natively supported formats so that you can make engaging movies with your MKV clips.
Free Download Dimo Video Converter Ultimate (Win/Mac):
[Quick workaround] Transcode MKV to Camtasia Studio 9/8 Friendly Format
1. Add MKV files
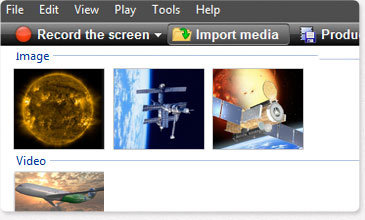
Run the MKV converter for Camtasia and click "Add file" button to import the MKV files. As you can see, you can also drag and drop the media to the program's main interface.
 2. Choose output format
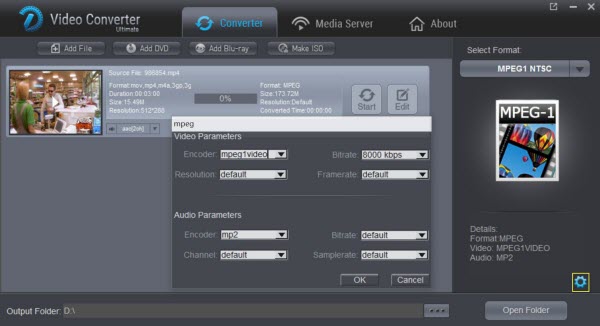
Click "Select Format" bar and choose "MPEG-1" or "QuickTime MOV" from "Format > Video", which can be recognized by Camtasia.
The following formats are able to be imported into Camtasia Studio for editing & production:
AVI, WMV, MPEG-1
MOV (QuickTime for Windows must be installed for MOV import.)
MTS and M2TS files. (Version 8.4 and later) You will need the AC-3 Filter if running Windows 7 or Winodws 8.0.
MP4 (AVC/h.264 at no more than 30 frames per second)
MP3,WAV,WMA
Tips:
a. Click the Settings icon to adjust video and audio parameters on the Profile Setting as you need to get the best quality video since Camtasia Studio 9, 8 is optimized for high definition video editing.
2. Choose output format
Click "Select Format" bar and choose "MPEG-1" or "QuickTime MOV" from "Format > Video", which can be recognized by Camtasia.
The following formats are able to be imported into Camtasia Studio for editing & production:
AVI, WMV, MPEG-1
MOV (QuickTime for Windows must be installed for MOV import.)
MTS and M2TS files. (Version 8.4 and later) You will need the AC-3 Filter if running Windows 7 or Winodws 8.0.
MP4 (AVC/h.264 at no more than 30 frames per second)
MP3,WAV,WMA
Tips:
a. Click the Settings icon to adjust video and audio parameters on the Profile Setting as you need to get the best quality video since Camtasia Studio 9, 8 is optimized for high definition video editing.
 b. To make a highlight video out of downloaded MKV before converting, you can do some trimmings first:
To start with, click the “Edit” button. In the new video editor, find the “trim” tab, in the timeline, set the start time point and the end time point in the "start" and "end" boxes. And, finally click the “OK” button to finish editing. You can also change your new clip length by clicking “Delete” button. Also you are able to merge many separate trimmed segments into one.
3: Starting converting MKV files
Simply click the "Start" button to start converting MKV to Camtasia Studio and everything else will be automated. If you have added quite a bunch of video files, it would take some time to convert.
b. To make a highlight video out of downloaded MKV before converting, you can do some trimmings first:
To start with, click the “Edit” button. In the new video editor, find the “trim” tab, in the timeline, set the start time point and the end time point in the "start" and "end" boxes. And, finally click the “OK” button to finish editing. You can also change your new clip length by clicking “Delete” button. Also you are able to merge many separate trimmed segments into one.
3: Starting converting MKV files
Simply click the "Start" button to start converting MKV to Camtasia Studio and everything else will be automated. If you have added quite a bunch of video files, it would take some time to convert.
 You're done. Now your MKV files will be converted into MPEG-1/MOV files ready to be imported to Camtasia Studio beautifully. Then customize and edit into your own video for sharing with your clients, your students or your friends.
In addition to convert videos like MKV, MXF, MP4, MOV, etc. to Camtasia, Dimo Video Converter Ultimate can also encode Camtasia Studio recorded videos to play and share anywhere you like or even export to MKV as well. Have a try!
Free Download or Purchase Dimo Video Converter Ultimate:
Kindly Note:
The price of Dimo Video Converter Ultimate for Windows is divided into 1 Year Subscription, Lifetime/Family/Business License: $43.95/Year; $45.95/lifetime license; $95.95/family license(2-4 PCs); $189.95/business pack(5-8 PCs). Get your needed one at purchase page.
Contact us or leave a message at Facebook if you have any issues.
Related Articles:
Source: Make MKV files editable in Camtasia Studio 9/8
You're done. Now your MKV files will be converted into MPEG-1/MOV files ready to be imported to Camtasia Studio beautifully. Then customize and edit into your own video for sharing with your clients, your students or your friends.
In addition to convert videos like MKV, MXF, MP4, MOV, etc. to Camtasia, Dimo Video Converter Ultimate can also encode Camtasia Studio recorded videos to play and share anywhere you like or even export to MKV as well. Have a try!
Free Download or Purchase Dimo Video Converter Ultimate:
Kindly Note:
The price of Dimo Video Converter Ultimate for Windows is divided into 1 Year Subscription, Lifetime/Family/Business License: $43.95/Year; $45.95/lifetime license; $95.95/family license(2-4 PCs); $189.95/business pack(5-8 PCs). Get your needed one at purchase page.
Contact us or leave a message at Facebook if you have any issues.
Related Articles:
Source: Make MKV files editable in Camtasia Studio 9/8