Found some torrent movies or TV shows in AVI format, or some family AVI footages from your digital camcorders or mobile phone that is perfect for your PowerPoint presentation and would like to embed it to make the PPT more interesting and appealing? However, many people encountered error message when they tried to insert the AVI video file into PowerPoint slide, no matter PowerPoint 2016, 2010, 2003, 2007 or lower version. Things could get even worse, you successfully add an AVI movie in PowerPoint, but you still get a "Cannot play back the file. The format is not supported" message when you play the video during a presentation. Well, read on to learn detailed reason and solution. Why we can't insert an AVI video into PowerPoint PPT successfully?First, look at the best Video Formats for PowerPoint:The best video formats for PPT can be varied depending on what version of PowerPoint and what computer system you are using. Here is a concise list:1. PowerPoint 2007 and lower version According to Microsoft, PowerPoint 2007 and lower version only support WMV, AVI, ASF, and MPG (MPEG-1) video formats, However, some .avi files may require additional codecs, if your computer doesn't install according video and audio codec, the AVI video embed may cannot playback in PowerPoint 2007/2003/2002/2000/97/95.For the best video playback experience,
- If you are using a Windows 8 or Windows 10 computer, we recommend you to use .mp4 videos encoded with H.264 video and AAC audio to inserted to PowerPoint 2013.
- If you a Windows 7 or Windows Vista or Windows XP computer, we strongly recommend you to use WMV or MPEG-1 videos.
2. PowerPoint 2010 Only support .mp4, .mov, and .qt formats if the Apple QuickTime player is installed. That's why you can't play AVI in PowerPoint 2010.3. PowerPoint 2013 or 2016Only support .mp4 videos encoded with H.264 video (a.k.a. MPEG-4 AVC) and AAC audio. That's why you can't play AVI in PowerPoint 2013 or 2016.In order to play all kinds of AVI in PowerPoint with no restriction, the simple and efficient way is to convert AVI to WMV (with WMV8 codec), AVI (with some ancient codec) or MPG format, which are universal formats among all versions of PowerPoint. This solution will ensure that you can insert any AVI files into PowerPoint slide for playing successfully. Here are two parts to finish your task. Part I. Convert AVI to PowerPoint supported video formatsRecommended Tool: Dimo Video Converter Ultimate (Dimo Video Converter Ultimate for Mac)This is a nice small video converter took kit that is just the right AVI to PowerPoint Converter which can convert all kinds of AVI to PowerPoint supported WMV, AVI, MPG, MP4. Besides converting AVI to PowerPoint, it also helps to convert any other video formats including MOV, MKV, FLV, MP4, VOB, 3GP, MXF, MTS, AVCHD, WebM, and etc to PowerPoint video or audio format. It even supports to convert FLAC, OGG, AC3, etc to PowerPoint compatible AIFF, MP3, WMA, WAV, AU. with fast encoding speed and excellent output quality. After the conversion, you can easily use your movie files in any version of PowerPoint Presentation including PowerPoint 2016, 2010, 2007, 2003, 2000, 2002, 2005 or even PowerPoint 95, 97. It also features basic editing features such as trimming, rotating, cropping, watermarking, adding effecting, 3D creating. By using the trimming action you can clip a specific duration from a video clip and turn it into PowerPoint preferred format. Now just get the right version and follow the guide below to convert AVI to PowerPoint supported video formats.Free Download Dimo Video Converter Ultimate (Win/Mac):
 Simple clicks to convert AVI to PowerPoint supported formats1. Load AVI videosClick the"Add File" button to load AVI files from your computer or other devices like USB device, camcorder, AVI player, etc. You can also directly drag the files you want to convert to the main interface. Double click the video to preview it with the built-in AVI player.
  2. Select output formatClick Select Format bar and choose PowerPoint supported video format as output format.Tips:
- To insert and play AVI in PowerPoint for Windows, converting MP4 to MPEG-1 is recommended, you may also try WMV, AVI, ASF as the output video format. For PowerPoint 2013 and later version, you can select MP4 format which has already been preset as H.264/AAC by default.
- To add and play AVI in PowerPoint for Mac, converting AVI to MOV or H.264 MP4 is recommended.
3. Edit the AVI videos (Optional)Click the "Edit" button and edit your videos before processing format conversion. There are main seven functions available: Trim, Adjust, Watermark, Effect and 3D. When enter the edit > Trim interface, you should either drag the slider bar back and forth or set the start time and the end time for the video to get the part you want. 4. Do video/audio settings (Optional)This AVI to PPT converter looks to be a simple program until you see all the rather complex advanced options hidden away in the "Setting" button, where there has support of configuration for each of the variety of video formats and codecs.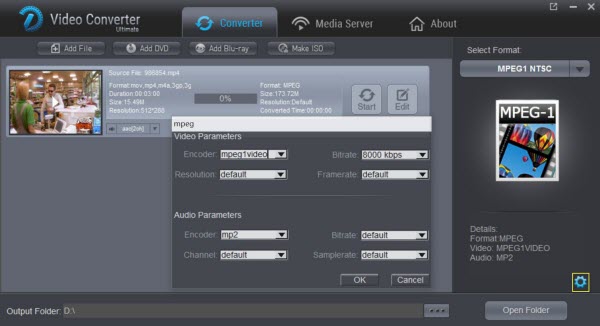 In addition to converting AVI to PowerPoint video, the program has presets from columns on the left side for dozens of popular devices like the iPad, iPhone, TV, VR and many more. Just select a preset and it will fill in all the settings for you accordingly.4. Start the conversionClick "Start" to begin converting AVI to PowerPoint compatible video files. After the conversion, you will get the desired videos in the destination folder.Part II. Insert your converted AVI video to PowerPointBefore starting adding video to PowerPoint, you need to create a folder and put both your converted video and your PowerPoint presentation in this folder. Then open the PowerPoint in this folder to insert the converted video file which is just located in this folder.Open your PowerPoint presentation and click "Insert".
- For PowerPoint 2013, click the Video drop-down arrow, then select Video on My PC. Locate and select the desired video file, then click Insert.
- For PowerPoint 2007, choose Movie and select the video clips.
- For PowerPoint 2003, select "Movie and Sounds" > "Movie from File" to choose the video clips.
In this way, you can play any kind of AVI file in PowerPoint without the limitation! The workflow is convenient and flexible in spite of the PowerPoint version you are using. Now, everything should run as smooth as clockwork. Just enjoy your vivid PowerPoint slide presentation. So here is the whole tutorial. Hope you have found the solution for your question and if you thnk it's helpful, please share the tip with others. Free Download or Purchase Dimo Video Converter Ultimate:

 Kindly Note:The price of Dimo Video Converter Ultimate for Windows is divided into 1 Year Subscription, Lifetime/Family/Business License: $43.95/Year; $45.95/lifetime license; $95.95/family license(2-4 PCs); $189.95/business pack(5-8 PCs). Get your needed one at purchase page.Related Software:BDmate (Win/Mac)Lossless backup Blu-ray to MKV with all audio and subtitle tracks; Rip Blu-ray to multi-track MP4; Convert Blu-ray to almost all popular video/audio formats and devices; Copy Blu-ray to ISO; Share digitized Blu-ray wirelessly.DVDmate (Win/Mac)A professional DVD ripping and editing tool with strong ability to remove DVD protection, transcode DVD to any video and audio format, and edit DVD to create personal movie.Videomate (Win/Mac)An all-around video converter software program that enables you to convert various video and audio files to formats that are supported by most multimedia devices.8K Player (Win/Mac)A mixture of free HD/4K video player, music player, Blu-ray/DVD player, video recorder and gif maker. Contact us or leave a message at Facebook if you have any issues.Related Articles:
Source: Why can't I insert or play AVI videos in PowerPoint?
Kindly Note:The price of Dimo Video Converter Ultimate for Windows is divided into 1 Year Subscription, Lifetime/Family/Business License: $43.95/Year; $45.95/lifetime license; $95.95/family license(2-4 PCs); $189.95/business pack(5-8 PCs). Get your needed one at purchase page.Related Software:BDmate (Win/Mac)Lossless backup Blu-ray to MKV with all audio and subtitle tracks; Rip Blu-ray to multi-track MP4; Convert Blu-ray to almost all popular video/audio formats and devices; Copy Blu-ray to ISO; Share digitized Blu-ray wirelessly.DVDmate (Win/Mac)A professional DVD ripping and editing tool with strong ability to remove DVD protection, transcode DVD to any video and audio format, and edit DVD to create personal movie.Videomate (Win/Mac)An all-around video converter software program that enables you to convert various video and audio files to formats that are supported by most multimedia devices.8K Player (Win/Mac)A mixture of free HD/4K video player, music player, Blu-ray/DVD player, video recorder and gif maker. Contact us or leave a message at Facebook if you have any issues.Related Articles:
Source: Why can't I insert or play AVI videos in PowerPoint?
Canon's new 5D Mark IV succeeds the Mark III with more of everything. But most importantly, it records DCI 4K (4096 x 2160) video instead of UHD 4K (3840 x 2160) video using MPEG-4 AVC/H.264 compression. While enjoying the stunning video quality, many folks are having problems when importing 5D Mark IV DIC 4K video to Adobe Premiere Pro (even with the latest Premiere Pro CC). If you're in such a situation, you can read on the article to learn more, which mainly shows you how to get 5D Mark IV 4K MP4 or MOV footage and Premiere Pro to work beautifully.
 Granted, Premiere Pro CS6, CC can handle (usually) 4K files without much problem, but it is extremely hardware intensive. Thankfully you probably don't have to buy a new computer... Something else, the recorded MOV/MP4 files are compressed using the h.264 codec, which is final delivery codec and it is not one you want to use for editing. On this circumstance, if you are stick to import 5D Mark IV 4K videos in PPro, you'd better convert them to a more editing-friendly format for Premiere Pro and 1080p would be the best settings. The following paragraphs show you how to transcode Canon 5D Mark IV 4K files for editing with Premiere Pro without bogging down your computer.
Well, with the help of Dimo Video Converter Ultimate for Mac, the process is surprisingly easy and can be done. Overall, this video conversion program can effortlessly encode/re-encode 4K H.264(MP4/MOV), XAVC, XAVC S, etc footage from Canon, Sony, Panasonic, DJI, etc. for smoothly importing and editing in various non-linear editing systems (NLE), including Adobe Premiere Pro, Avid Media Composer, Final Cut Pro, iMovie, FCE and more.
Besides converting Canon 5D Mark IV 4K for editing, you can also use the program to transcode 5D Mark IV 4K to the best formats for viewing on 4K TV, uploading to YouTube/Facebook/Vimeo. If you work 4K files from 5D Mark IV in Adobe Premiere Pro on Windows PC, please turn to 4K Video Converter to solve the issues.
Granted, Premiere Pro CS6, CC can handle (usually) 4K files without much problem, but it is extremely hardware intensive. Thankfully you probably don't have to buy a new computer... Something else, the recorded MOV/MP4 files are compressed using the h.264 codec, which is final delivery codec and it is not one you want to use for editing. On this circumstance, if you are stick to import 5D Mark IV 4K videos in PPro, you'd better convert them to a more editing-friendly format for Premiere Pro and 1080p would be the best settings. The following paragraphs show you how to transcode Canon 5D Mark IV 4K files for editing with Premiere Pro without bogging down your computer.
Well, with the help of Dimo Video Converter Ultimate for Mac, the process is surprisingly easy and can be done. Overall, this video conversion program can effortlessly encode/re-encode 4K H.264(MP4/MOV), XAVC, XAVC S, etc footage from Canon, Sony, Panasonic, DJI, etc. for smoothly importing and editing in various non-linear editing systems (NLE), including Adobe Premiere Pro, Avid Media Composer, Final Cut Pro, iMovie, FCE and more.
Besides converting Canon 5D Mark IV 4K for editing, you can also use the program to transcode 5D Mark IV 4K to the best formats for viewing on 4K TV, uploading to YouTube/Facebook/Vimeo. If you work 4K files from 5D Mark IV in Adobe Premiere Pro on Windows PC, please turn to 4K Video Converter to solve the issues.
Free Download Dimo Video Converter Ultimate for Mac/Win:
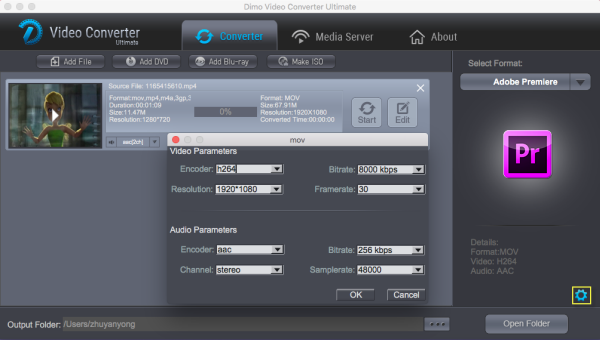
Simple Steps to Transcode Canon 5D Mark IV 4K video to Premiere Pro
Step 1: Click on "Add File" to import your files. Alternatively, you can directly drag and drop your 4K videos from Canon 5D Mark IV to the program for converting to Pro.
 Step 2: Select "Adobe Premiere" from the "Editor" as output format for editing Canon 5D Mark IV 4K in Adobe Premiere Pro with natively supported video codec.
Tips: Click "Settings" button if you'd like to customize advanced audio and video parameters like Video Codec, aspect ratio, bit rate, frame rate, Audio codec, sample rate, audio channels. Note: If you want to get original 4K resolution, just keep the video size as original.
Step 3. Hit the "Start" button of the best 4K Video Converter for Mac. It will start converting 4K for importing to Adobe Premiere Pro immediately. Soon after the conversion, just click "Open" button to get the generated files for natively editing Canon 5D Mark IV 4K video in Premiere Pro CC/CS6 as well as CS5/CS4/CS3 perfectly.
Step 2: Select "Adobe Premiere" from the "Editor" as output format for editing Canon 5D Mark IV 4K in Adobe Premiere Pro with natively supported video codec.
Tips: Click "Settings" button if you'd like to customize advanced audio and video parameters like Video Codec, aspect ratio, bit rate, frame rate, Audio codec, sample rate, audio channels. Note: If you want to get original 4K resolution, just keep the video size as original.
Step 3. Hit the "Start" button of the best 4K Video Converter for Mac. It will start converting 4K for importing to Adobe Premiere Pro immediately. Soon after the conversion, just click "Open" button to get the generated files for natively editing Canon 5D Mark IV 4K video in Premiere Pro CC/CS6 as well as CS5/CS4/CS3 perfectly.
Free Download or Purchase Dimo Video Converter Ultimate for Mac/Win:


Kindly Note:
The price of Dimo Video Converter Ultimate for Mac is divided into 1 Year Subscription, Lifetime/Family/Business License: $43.95/Year; $45.95/lifetime license; $95.95/family license(2-4 Macs); $189.95/business pack(5-8 Macs). Get your needed one at purchase page.
Related Software:
BDmate (Mac/Win)
Lossless backup Blu-ray to MKV with all audio and subtitle tracks; Rip Blu-ray to multi-track MP4; Convert Blu-ray to almost all popular video/audio formats and devices; Copy Blu-ray to ISO/M2TS; Share digitized Blu-ray wirelessly.
DVDmate (Mac/Win)
A professional DVD ripping and editing tool with strong ability to remove DVD protection, transcode DVD to any video and audio format, and edit DVD to create personal movie.
Videomate (Mac/Win)
An all-around video converter software program that enables you to convert various video and audio files to formats that are supported by most multimedia devices.
8K Player (Mac/Win)
A mixture of free HD/4K video player, music player, Blu-ray/DVD player, video recorder and gif maker.
Contact us or leave a message at Facebook if you have any issues.
Related Articles:
Source: Transcode Canon 5D Mark IV 4K video to Premiere Pro
Sunnypeak VRG-10900 headset is a great option for the ones that do not want to spend too much money on such a product. The model is fairly similar to the original Google Cardboard VR headset but it is significantly more comfortable and secure. It can hold Android and iOS smartphones of up to 6 inches in screen size and an adjustable head strap that makes it fairly comfortable to use even for several continuous hours. Unfortunately to movie fans, Sunnypeak VR can only play some specific type of video files with VR player app. So the question is "How to get unsupported 3D Movies to your Sunnypeak VRG-10900 headset for playing on iPhone with 3D efforts. Having no idea? No worries, find the best solution as below.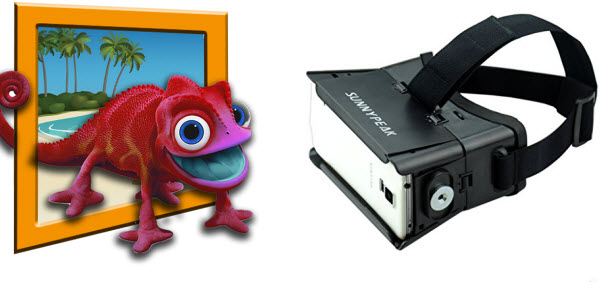 Now, you need know the Sunnypeak VRG-10900 supported video formats:3D Video Supported: 3D SBS video2D Video Supported: MP4, MOV, M4V, etc.1. To add supported 3D movies on Sunnypeak VR for watching, please read this part to learn the transferrring way like Google Cardboard.2. Not all the video files are supported by Sunnypeak VR. How to add unsupported 3D movies to Sunnypeak VR?If you have many 3D movie or video sources like 3D M2TS (backed up from 3D Blu-ray), 3D movies downloaded in MKV/WMV/AVI, 3D YouTube, 3D YIFY, 3D MTS/AVI shootings from 3D camcorders and so on, it is a pity that these 3D media files aren't supported by Sunnypeak VRG-10900 natively. Besides, some smartphones limits the vertical resolution to a maximum of 1080 pixels and the maximum frame rate to 30 frames per second. In such cases, you may need to reformat the incompatible 2D/3D movies to Sunnypeak VR playable format and change specifications for Sunnypeak VR with different dimensions, if you are much eager to watch 3D movies on Sunnypeak VRG-10900 via iPhone freely.Dimo Video Converter Ultimate is the best video converter for VR. For one thing, it supports converting the 3D M2TS, 3D YIFY MKV, 3D AVI, 3D WMV, 3D YouTube FLV, 3D MTS, etc. as well as all 2D videos, Blu-ray/DVD movies to Sunnypeak VR accessable 3D SBS MP4/MOV formats for watching via iPhone; for another, this VR video format converter also allows users to select and adjust aspect ratio, change bitrate and other video/audio parameters to get the most ideal 3D effect at your needs. In addition to make 3D movie files accepted by Sunnypeak VR, you can also view the 3D SBS MP4 movie on other any VR Headsets like Gear VR, Oculus Rift, Google Cardboard, VR One (Plsu), Google Daydream View, HTC Vive/SteamVR, PlayStation VR, ANTVR Kit VR Headset, Avegant Glyph, Microsoft HoloLens, etc. with ease. The 3D Movie Converter support various devices like iPhone 7/7 Plus, iPhone 6S/6S Plus, iPhone 6/6 Plus, Android phones/tables, HTC, LG, Samsung Galaxy, iPad Pro/Air 2/3/Mini 4/Mini 3, Smart TV, PC/Mac with 3D player and other player, etc. For Mac user, you can download Dimo Video Converter Ultimate for Mac (including macOS Sierra 10.12, El Capitan 10.11), which has the same function as the Windows version. Even freshers can quickly finish the 3D movies to Sunnypeak VR conversion. Download it and make compatible 3D movies at home!Free Download Dimo Video Converter Ultimate (Win/Mac): Simple Steps to Convert 2D/3D to 3D MP4/MOV Video for Sunnypeak VRG-10900Step 1: Load 2D/3D movieLaunch the 3D video converter and load your desired 2D, 3D movie or 360 video file onto software window. This task can be completed with two easy to follow methods: either you need to hit the "Add File" option on your screen so that file explorer can be opened and desired video file can be selected directly whereas the second most commonly used method allow users to easily drag files onto software window.
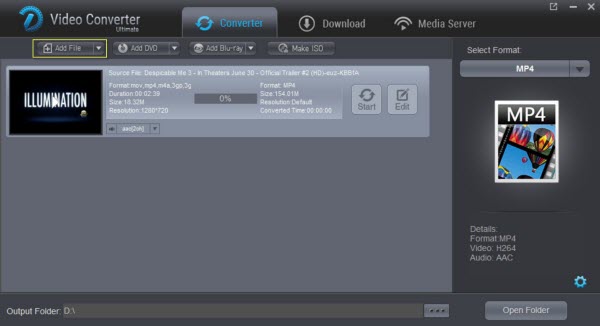 Step 2: Choose an output formatSunnypeak VR can accept 3D SBS MP4/MOV so you can click "Select Format" bar on the interface then navigate to "Format > Video" or "Format > HD Video" to choose "MP4" or "MOV" as the output format. And MP4 is highly recommended for its easy availability, high compatibility, great compression rate and especially amazing video quality.Step 3: Set 3D effect retained in outputIf you wanna get 3D effect with the output videos, click "Edit". In the editor opened, turn to "3D" tab and choose 3D effect (Red-Blue, Left-Right, Top-Bottom three modes) from the option. Here "Left-Right" is recommended. The supported editing functions also include cropping frame size, trimming the length, adding watermark, adding special effect and so on.Tips: Click "Settings" button to do corresponding settings regarding to video, audio like video codec, file size, video bitrate, frame rate, etc. Movies in 720p resolution are best for watching in the VR One Cinema. Note 1280*720 compressed side-by-side 3D should be resampled to 1280*360 resolution full side-by-side resolution.
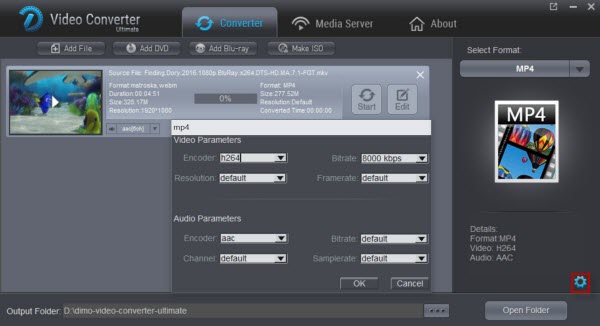 Step 3: Start 3D movie conversion for Sunnypeak VRG-10900Hit the "Start" button to transfer your 2D/3D to MP4 Side-by-Side 3D video for playback with Sunnypeak VRG-10900. After conversion, you can hit "Open" to find the generated 3D videos. Then, you can transfer the converted video files to iPhone and other devices for Sunnypeak VRG-10900 enjoyment.To watch movie with Sunnypeak VRG-10900, you have to install a VR Application first. Enter APP store, search Virtual Reality APP in key words 'VR'. And then download VR app and run it on your iPhone. It is now much easier to access your 3D movies on Sunnypeak VRG-10900 via iPhone as Dimo VR video converter tool assists in easy synchronization.Related Software:BDmate (Win/Mac)Lossless backup Blu-ray to MKV with all audio and subtitle tracks; Rip Blu-ray to multi-track MP4; Convert Blu-ray to almost all popular video/audio formats and devices; Copy Blu-ray to ISO; Share digitized Blu-ray wirelessly.DVDmate (Win/Mac)A professional DVD ripping and editing tool with strong ability to remove DVD protection, transcode DVD to any video and audio format, and edit DVD to create personal movie.Videomate (Win/Mac)An all-around video converter software program that enables you to convert various video and audio files to formats that are supported by most multimedia devices.8K Player (Win/Mac)A mixture of free HD/4K video player, music player, Blu-ray/DVD player, video recorder and gif maker. Free Download or Purchase Dimo Video Converter Ultimate: Kindly Note:The price of Dimo Video Converter Ultimate for Windows is divided into 1 Year Subscription, Lifetime/Family/Business License: $43.95/Year; $45.95/lifetime license; $95.95/family license(2-4 PCs); $189.95/business pack(5-8 PCs). Get your needed one at purchase page.Related Software:BDmate (Win/Mac)Lossless backup Blu-ray to MKV with all audio and subtitle tracks; Rip Blu-ray to multi-track MP4; ConvertBlu-ray to almost all popular video/audio formats and devices; Copy Blu-ray to ISO/M2TS; Share digitized Blu-ray wirelessly.DVDmate (Win/Mac)A professional DVD ripping and editing tool with strong ability to remove DVD protection, transcode DVD to any video and audio format, and edit DVD to create personal movie.Videomate (Win/Mac)An all-around video converter software program that enables you to convert various video and audio files to formats that are supported by most multimedia devices.8K Player (Win/Mac)A mixture of free HD/4K video player, music player, Blu-ray/DVD player, video recorder and gif maker. Contact us or leave a message at Facebook if you have any issues.Related Articles:
Source: Enjoy 3D movies on Sunnypeak VRG-10900 via iOS/Android
Step 3: Start 3D movie conversion for Sunnypeak VRG-10900Hit the "Start" button to transfer your 2D/3D to MP4 Side-by-Side 3D video for playback with Sunnypeak VRG-10900. After conversion, you can hit "Open" to find the generated 3D videos. Then, you can transfer the converted video files to iPhone and other devices for Sunnypeak VRG-10900 enjoyment.To watch movie with Sunnypeak VRG-10900, you have to install a VR Application first. Enter APP store, search Virtual Reality APP in key words 'VR'. And then download VR app and run it on your iPhone. It is now much easier to access your 3D movies on Sunnypeak VRG-10900 via iPhone as Dimo VR video converter tool assists in easy synchronization.Related Software:BDmate (Win/Mac)Lossless backup Blu-ray to MKV with all audio and subtitle tracks; Rip Blu-ray to multi-track MP4; Convert Blu-ray to almost all popular video/audio formats and devices; Copy Blu-ray to ISO; Share digitized Blu-ray wirelessly.DVDmate (Win/Mac)A professional DVD ripping and editing tool with strong ability to remove DVD protection, transcode DVD to any video and audio format, and edit DVD to create personal movie.Videomate (Win/Mac)An all-around video converter software program that enables you to convert various video and audio files to formats that are supported by most multimedia devices.8K Player (Win/Mac)A mixture of free HD/4K video player, music player, Blu-ray/DVD player, video recorder and gif maker. Free Download or Purchase Dimo Video Converter Ultimate: Kindly Note:The price of Dimo Video Converter Ultimate for Windows is divided into 1 Year Subscription, Lifetime/Family/Business License: $43.95/Year; $45.95/lifetime license; $95.95/family license(2-4 PCs); $189.95/business pack(5-8 PCs). Get your needed one at purchase page.Related Software:BDmate (Win/Mac)Lossless backup Blu-ray to MKV with all audio and subtitle tracks; Rip Blu-ray to multi-track MP4; ConvertBlu-ray to almost all popular video/audio formats and devices; Copy Blu-ray to ISO/M2TS; Share digitized Blu-ray wirelessly.DVDmate (Win/Mac)A professional DVD ripping and editing tool with strong ability to remove DVD protection, transcode DVD to any video and audio format, and edit DVD to create personal movie.Videomate (Win/Mac)An all-around video converter software program that enables you to convert various video and audio files to formats that are supported by most multimedia devices.8K Player (Win/Mac)A mixture of free HD/4K video player, music player, Blu-ray/DVD player, video recorder and gif maker. Contact us or leave a message at Facebook if you have any issues.Related Articles:
Source: Enjoy 3D movies on Sunnypeak VRG-10900 via iOS/Android
Before sharing your iPhone recordings on YouTube/Vimeo//Facebook/Instagram, you may want to edit iPhone videos in a video editing program. However, you may find it a painful experience to put iPhone videos to Premiere Pro. That's because the iPhone (including iPhone 7, iPhone 7 Plus, iPhone 6, iPhone 6 Plus, iPhone 5S, iPhone 5C, iPhone 4S, etc.) records and outputs its files as .MOV files. Files are compressed using the h.264 codec, which is not good for editing in Premiere Pro. This tutorial will quickly walk you through how to drag and drop iPhone 7 (4K) videos to Premiere Pro timeline for editing without hassle.
 To work iPhone 7 (4K) videos in Premiere Pro smoothly, we need convert iPhone video to Adobe Premiere preferred MPEG-2 or H.264 files and then import the converted files to Premiere Pro for editing. Dimo Video Converter Ultimate for Mac is recommended here to help you encode all of your iPhone (4K) files to MPEG-2/H.264 for using in Premiere Pro CC/CS6/CS5.
It is an optimal video converter for iPhone (4K) recordings. With it, you can transcode iPhone 4K H.264 .MOV to MPEG-2 for editing with PPro on Mac directly without any rendering or codec problems. Plus, it also allows you to convert iPhone videos to DNxHD for Avid Media Composer, MPEG-2 for After Effects, ProRes for Final Cut Pro, Apple InterMediate Codec for iMovie/FCE, etc with best results. Download it and follow the tutorial below to convert iPhone (4K) files to Premiere Pro CC/CS6/CS5 effortlessly.
To work iPhone 7 (4K) videos in Premiere Pro smoothly, we need convert iPhone video to Adobe Premiere preferred MPEG-2 or H.264 files and then import the converted files to Premiere Pro for editing. Dimo Video Converter Ultimate for Mac is recommended here to help you encode all of your iPhone (4K) files to MPEG-2/H.264 for using in Premiere Pro CC/CS6/CS5.
It is an optimal video converter for iPhone (4K) recordings. With it, you can transcode iPhone 4K H.264 .MOV to MPEG-2 for editing with PPro on Mac directly without any rendering or codec problems. Plus, it also allows you to convert iPhone videos to DNxHD for Avid Media Composer, MPEG-2 for After Effects, ProRes for Final Cut Pro, Apple InterMediate Codec for iMovie/FCE, etc with best results. Download it and follow the tutorial below to convert iPhone (4K) files to Premiere Pro CC/CS6/CS5 effortlessly.
Free Download Dimo Video Converter Ultimate for Mac/Win:
Convert iPhone video clips to Premiere Pro for editing
Step 1: Add iPhone (4K) files
Install and launch the iPhone 4K Video Converter for Mac, and then click "Add File" button to import your 4K files to the software.
Step 2: Select output format
Click "Select Format" bar to determine output format. Follow "Editor" and select "Adobe Premiere" as the output format. Besides, you can also choose WMV if you want to get a relatively smaller output file.
Tips:
1. Settings- Click it to customize audio and video parameters Video Codec, bit rate, frame rate, Audio codec, sample rate, audio channels.
 2. Editor - Click "Edit" to set add watermark, deinterlace, trim, crop, add effects, etc.
Step 3: Convert iPhone (4K) video to Adobe Premiere
Click "Start" button under the preview window, the converter will start encoding iPhone (4K) videos for importing to Adobe Premiere. Soon after the conversion is finished, just click "Open" button to get the converted iPhone 7 (4K) videos for edit in Adobe Premiere Pro CC/CS6/CS5 perfectly.
Free Download or Purchase Dimo Video Converter Ultimate for Mac/Win:
Kindly Note:
The price of Dimo Video Converter Ultimate for Mac is divided into 1 Year Subscription, Lifetime/Family/Business License: $43.95/Year; $45.95/lifetime license; $95.95/family license(2-4 Macs); $189.95/business pack(5-8 Macs). Get your needed one at purchase page.
Related Software:
BDmate (Mac/Win)
Lossless backup Blu-ray to MKV with all audio and subtitle tracks; Rip Blu-ray to multi-track MP4; Convert Blu-ray to almost all popular video/audio formats and devices; Copy Blu-ray to ISO/M2TS; Share digitized Blu-ray wirelessly.
DVDmate (Mac/Win)
A professional DVD ripping and editing tool with strong ability to remove DVD protection, transcode DVD to any video and audio format, and edit DVD to create personal movie.
Videomate (Mac/Win)
An all-around video converter software program that enables you to convert various video and audio files to formats that are supported by most multimedia devices.
8K Player (Mac/Win)
A mixture of free HD/4K video player, music player, Blu-ray/DVD player, video recorder and gif maker.
Contact us or leave a message at Facebook if you have any issues.
Related Articles:
Source: Import iPhone 7 (4K) Video to Premiere Pro for editing
2. Editor - Click "Edit" to set add watermark, deinterlace, trim, crop, add effects, etc.
Step 3: Convert iPhone (4K) video to Adobe Premiere
Click "Start" button under the preview window, the converter will start encoding iPhone (4K) videos for importing to Adobe Premiere. Soon after the conversion is finished, just click "Open" button to get the converted iPhone 7 (4K) videos for edit in Adobe Premiere Pro CC/CS6/CS5 perfectly.
Free Download or Purchase Dimo Video Converter Ultimate for Mac/Win:
Kindly Note:
The price of Dimo Video Converter Ultimate for Mac is divided into 1 Year Subscription, Lifetime/Family/Business License: $43.95/Year; $45.95/lifetime license; $95.95/family license(2-4 Macs); $189.95/business pack(5-8 Macs). Get your needed one at purchase page.
Related Software:
BDmate (Mac/Win)
Lossless backup Blu-ray to MKV with all audio and subtitle tracks; Rip Blu-ray to multi-track MP4; Convert Blu-ray to almost all popular video/audio formats and devices; Copy Blu-ray to ISO/M2TS; Share digitized Blu-ray wirelessly.
DVDmate (Mac/Win)
A professional DVD ripping and editing tool with strong ability to remove DVD protection, transcode DVD to any video and audio format, and edit DVD to create personal movie.
Videomate (Mac/Win)
An all-around video converter software program that enables you to convert various video and audio files to formats that are supported by most multimedia devices.
8K Player (Mac/Win)
A mixture of free HD/4K video player, music player, Blu-ray/DVD player, video recorder and gif maker.
Contact us or leave a message at Facebook if you have any issues.
Related Articles:
Source: Import iPhone 7 (4K) Video to Premiere Pro for editing
Fanciful to create 3D movies for playing on Oculus Rift? Certainly not. Maybe it has been imagined before, but in the prevailing Virtual Reality times, making 3D VR videos yourselves come true even you thought you are just an amateur. There are a few tricks required to be able to watch your own movie library on Oculus Rift, as well as convert incompatible videos for Oculus Rift in 3D. Read on. How to create 3D MP4/MKV videos for Oculus Rift? To watch your own 2D/3D movies and even 360 degree videos on Oculus Rift with 3D effect, you can download a free VR player app like Virtual Desktop, which allows you to enjoy your movies in correct video mode. Just browser the videos and put on your Rift to enjoy. Why not play good movie sources with built-in Oculus Video App?If you have an Oculus Rift, you have probably noticed the built in Video App. The Oculus App has several limitations which include:* Inability to detect automatically 360-degree movies stored on your computer. Workaround: Rename any 360-degree movie you have so the filename ending with _360, then the player will pick up the file for playback in 360 degrees.* The player will play regular video files such as .MKV in a virtual movie theater, which is cool, but it will not play 3D movies or play any sound if the audio is encoded in DD5.1, DTS or any surround sound formatYou may tired of the hundreds of simple trailers, demos and some shorts from online on Rift with 3rd party VR players. In these cases, you do the favor to seek the chance to see spectacular local films in Blu-ray, DVD, AVI, MKV, MTS, MXF, YouTube FLV, YIFY, etc. within Oculus Rift, can be done? So as to finish the task, you can adopt 3D movie creating software of Dimo Video Converter Ultimate for help. With it you can easily convert 2D/3D movies or rip Blu-ray/DVDs to MKV, MP4, AVI WMV with 3D effect to create true theater entertainment. If you have the colorful 3D glasses and 3D player on PC like Stereoscopic Player or 3D TV, it couldn't be more wonderful to create 3D Red-Green movies for them. If you're Mac users, then turn to Dimo Video Converter Ultimate for Mac, which allows you to create 3D videos for playback on Oculus Rift on Mac(including OS High Sierra and OS Sierra). Now download the right version and follow the tips below to finish your job. Free Download Dimo Video Converter Ultimate (Win/Mac): Steps to Make 3D movies for playing on Oculus RiftStep 1. Add own movie libraryInstall and launch the best 3D Converter for Oculus Rift, and add video files by clicking "Add file" or using "Drag & drop" method
 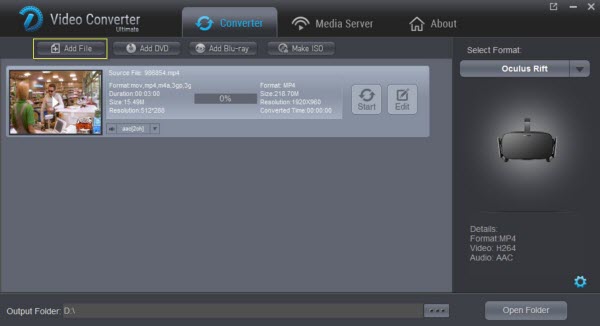 Step 2. Choose SBS 3D MP4/MKV as output format for Oculus Rift To watch mvoies on Oculus Rift with 3D effects, you can choose an Oculus Rift customized profile with its supported format: Go to the "Select Format" >"Device" >"VR" >"Oculus Rift" Step 3. Set Side-by-Side(SBS) for Oculus Rift VR Click "Edit" >"3D" >"left-right" >"OK". What's more, you can also use the useful build-in video editor in this Video Converter Ultimate to polish your video to get a better 3D visual entertainment.
 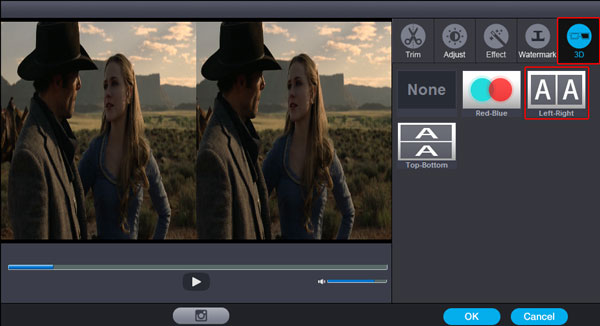 Note: Although there is a profile created by the application, if you like you can always change some parameters of resolution, compression, audio, etc to get your favor output 3D movies. An important issue that you must consider that in Oculus Rift VR resolution for each eye is not Full HD as the headset uses two separate OLED displays that receive their visual information from very powerful PCs running some of the world's best graphics cards. So you can free change your target video size, bitrate, frame rate in "Settings". Here, 720p (1280*720) with a higher bitrate around 5mbit/s is recommended. Higher resolutions for the specific format doesn't make the quality better but are a waste of power and battery life.Step 4. Start to convert 2D/3D videos to SBS 3D MKV/MP4 for Oculus Rift At last, simply click the "Start" button, and the 3D SBS maker will start the conversion for playback with Oculus Rift. After conversion, head to the destination folder where the converted files are stored (under "Open" button). After that, transferthem to Oculus Rift headset for playing.How to Watch Movies On The Oculus Rift (Development Kit 2 DK2)? Here we go:Step 1: Properly labeling your 360 and 3D videosBefore you can move your 360 and 3D videos to the Videos folder in your Windows system drive, it must be labeled in the proper format for Oculus to render it correctly.Label 3D videos:For 3D panoramic videos, top-bottom, bottom-top, left-right and right-left stereoscopic video support are implemented using the following naming convention:Naming conventions used to label your 3D panoramic video:"_TB.mp4" or "_360_TB.mp4" - Top / bottom 3D"_BT.mp4" or "_360_BT.mp4" - Bottom / top 3D"_LR.mp4" or "_360_LR.mp4" - Left / right side by side 3D"_RL.mp4" or "_360_RL.mp4" - Right / left side by side 3DPlease add the proper naming convention to the end of your video file name.Example: If your video file was MyCoolVideo.mp4, label it asMyCoolVideo_360_TB.mp4.Label 360 videos:360 videos in Oculus are implemented using spherical mapping to render panoramic videos. For your 360 video to be compatible with Oculus, add "_360" to the end of your file name. Example: If your video file was MyCoolVideo.mp4, label it as MyCoolVideo_360.mp4.Step 2: Transfer your videos to Oculus VideoThe Oculus Video app for Rift pulls video files from your default Windows video folder. To transfer your video files to the Windows Video folder:Open your Windows System drive (this is generally your C: drive).Open the Users folder.Select your user profile.Locate and open the Videos folder and move your videos here.The next time you launch Oculus Video, your videos will automatically appear in the "My Videos" section.How awesome is this? Yeah, it is that good! And then you can enjoy 3D movies on Oculus Rift (DK2) easily. With the innovative GUI, Dimo Video Converter Ultimate, the powerful software to create 3D movies for VR, has stepped into a whole new level of 3D performance and portability for VR videos. Wherever your ideas take you, you'll get there more than ever with adding 3D effects to own movie library, high-performance 3D Blu-ray/DVD ripping/handling based on 6X faster NVIDIA CUDA speed-up technology, state-of-the-art output VR presets like Oculus Rift, Samsung Gear VR, HTC Vive, etc., and more. Free Download or Purchase Dimo Video Converter Ultimate: Kindly Note:The price of Dimo Video Converter Ultimate for Windows is divided into 1 Year Subscription, Lifetime/Family/Business License: $43.95/Year; $45.95/lifetime license; $95.95/family license(2-4 PCs); $189.95/business pack(5-8 PCs). Get your needed one at purchase page.Related Software:BDmate (Win/Mac)Lossless backup Blu-ray to MKV with all audio and subtitle tracks; Rip Blu-ray to multi-track MP4; Convert Blu-ray to almost all popular video/audio formats and devices; Copy Blu-ray to ISO; Share digitized Blu-ray wirelessly.DVDmate (Win/Mac)A professional DVD ripping and editing tool with strong ability to remove DVD protection, transcode DVD to any video and audio format, and edit DVD to create personal movie.Videomate (Win/Mac)An all-around video converter software program that enables you to convert various video and audio files to formats that are supported by most multimedia devices.8K Player (Win/Mac)A mixture of free HD/4K video player, music player, Blu-ray/DVD player, video recorder and gif maker. Contact us or leave a message at Facebook if you have any issues.Related Articles:
Src: Create 3D MKV/MP4 movies for playing on Oculus Rift
Note: Although there is a profile created by the application, if you like you can always change some parameters of resolution, compression, audio, etc to get your favor output 3D movies. An important issue that you must consider that in Oculus Rift VR resolution for each eye is not Full HD as the headset uses two separate OLED displays that receive their visual information from very powerful PCs running some of the world's best graphics cards. So you can free change your target video size, bitrate, frame rate in "Settings". Here, 720p (1280*720) with a higher bitrate around 5mbit/s is recommended. Higher resolutions for the specific format doesn't make the quality better but are a waste of power and battery life.Step 4. Start to convert 2D/3D videos to SBS 3D MKV/MP4 for Oculus Rift At last, simply click the "Start" button, and the 3D SBS maker will start the conversion for playback with Oculus Rift. After conversion, head to the destination folder where the converted files are stored (under "Open" button). After that, transferthem to Oculus Rift headset for playing.How to Watch Movies On The Oculus Rift (Development Kit 2 DK2)? Here we go:Step 1: Properly labeling your 360 and 3D videosBefore you can move your 360 and 3D videos to the Videos folder in your Windows system drive, it must be labeled in the proper format for Oculus to render it correctly.Label 3D videos:For 3D panoramic videos, top-bottom, bottom-top, left-right and right-left stereoscopic video support are implemented using the following naming convention:Naming conventions used to label your 3D panoramic video:"_TB.mp4" or "_360_TB.mp4" - Top / bottom 3D"_BT.mp4" or "_360_BT.mp4" - Bottom / top 3D"_LR.mp4" or "_360_LR.mp4" - Left / right side by side 3D"_RL.mp4" or "_360_RL.mp4" - Right / left side by side 3DPlease add the proper naming convention to the end of your video file name.Example: If your video file was MyCoolVideo.mp4, label it asMyCoolVideo_360_TB.mp4.Label 360 videos:360 videos in Oculus are implemented using spherical mapping to render panoramic videos. For your 360 video to be compatible with Oculus, add "_360" to the end of your file name. Example: If your video file was MyCoolVideo.mp4, label it as MyCoolVideo_360.mp4.Step 2: Transfer your videos to Oculus VideoThe Oculus Video app for Rift pulls video files from your default Windows video folder. To transfer your video files to the Windows Video folder:Open your Windows System drive (this is generally your C: drive).Open the Users folder.Select your user profile.Locate and open the Videos folder and move your videos here.The next time you launch Oculus Video, your videos will automatically appear in the "My Videos" section.How awesome is this? Yeah, it is that good! And then you can enjoy 3D movies on Oculus Rift (DK2) easily. With the innovative GUI, Dimo Video Converter Ultimate, the powerful software to create 3D movies for VR, has stepped into a whole new level of 3D performance and portability for VR videos. Wherever your ideas take you, you'll get there more than ever with adding 3D effects to own movie library, high-performance 3D Blu-ray/DVD ripping/handling based on 6X faster NVIDIA CUDA speed-up technology, state-of-the-art output VR presets like Oculus Rift, Samsung Gear VR, HTC Vive, etc., and more. Free Download or Purchase Dimo Video Converter Ultimate: Kindly Note:The price of Dimo Video Converter Ultimate for Windows is divided into 1 Year Subscription, Lifetime/Family/Business License: $43.95/Year; $45.95/lifetime license; $95.95/family license(2-4 PCs); $189.95/business pack(5-8 PCs). Get your needed one at purchase page.Related Software:BDmate (Win/Mac)Lossless backup Blu-ray to MKV with all audio and subtitle tracks; Rip Blu-ray to multi-track MP4; Convert Blu-ray to almost all popular video/audio formats and devices; Copy Blu-ray to ISO; Share digitized Blu-ray wirelessly.DVDmate (Win/Mac)A professional DVD ripping and editing tool with strong ability to remove DVD protection, transcode DVD to any video and audio format, and edit DVD to create personal movie.Videomate (Win/Mac)An all-around video converter software program that enables you to convert various video and audio files to formats that are supported by most multimedia devices.8K Player (Win/Mac)A mixture of free HD/4K video player, music player, Blu-ray/DVD player, video recorder and gif maker. Contact us or leave a message at Facebook if you have any issues.Related Articles:
Src: Create 3D MKV/MP4 movies for playing on Oculus Rift