Sunday, April 9, 2017

How to Export/Convert iMovie Videos to MP4 on Mac

Because the compatibility of iMovie is poor, it is very difficult for iMovie to export directly to MP4. But what if you want to share your iMovie project, such as sharing with friends of Android/iOS device users? There is no doubt that iMovie projects are not compatible with mobile devices, then you should convert iMovie projects to MP4, because MP4 is the most widely accepted video format. However, it is not easy to find the right converter for many video converters on the Internet. Here you can find an easy-to-use converter that has the power you need.


Dimo Video Converter Ultimate for Mac is definitely one of the most welcome iMovie to MP4 converters for its intuitive and clean interface. Compared to other video converters, it is user-friendly, especially for newcomers, because its easy-to-understand operation method can save users lots of time from reading manual. Besides, this converter supports 159 formats including MKV, MP4, and MOV, H.265, etc., so the last problem you should worry about is the compatibility issue. In addition, it can finish the conversion within just a few minutes. Dimo Video Converter Ultimate for Mac also serves as a basic video editor that enables you to trim or cut videos or even add a special effects to videos.

Hot topics:   MP4 to iMovie  |  MKV to iMovie  |  MOV to MP4 | DVD to FCP  |  MTS/M2TS to FCP

Free Download Dimo Video Converter Ultimate for Mac/Win:


How to Convert iMovie to MP4 on Mac (OS Sierra)

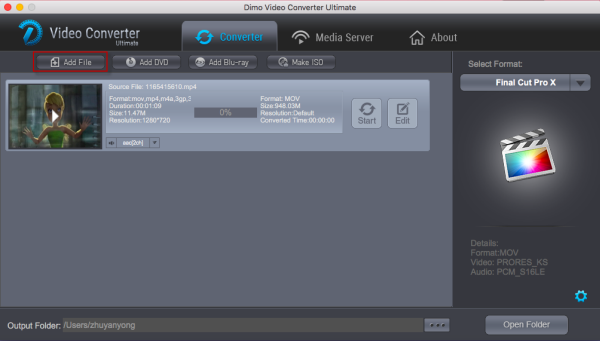
Step 1: Launch Dimo Video Converter Ultimate for Mac and then drag & drop iMovie video files to the app directly, or you can click "Add File" button to locate the iMovie video files you want to add.


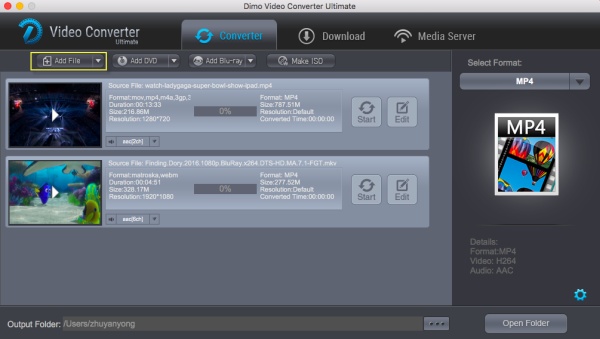
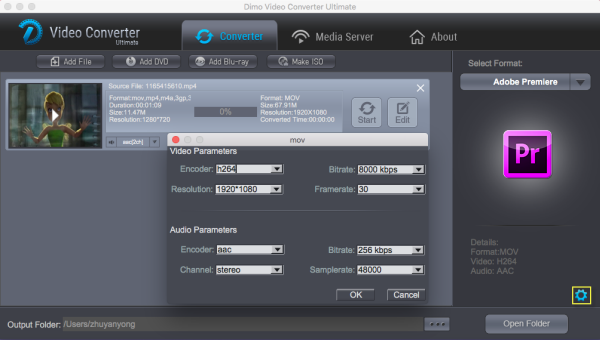
Step 2: Click "Select Format" bar and select MP4 as the output format from "Format > Video" list. If you prefer high definition video, you can choose "HD MP4" from the "Format > HD Video" list. H.265 MP4 are also supported. The program also has device-presets that will convert video to the correct resolution and format and instantly forward them to popular devices. So if you are willing to put the converted video to a certain media device, you can select the icon corresponding to the device in the presets list.

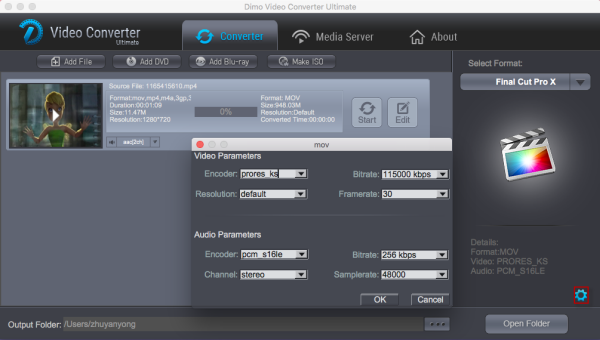
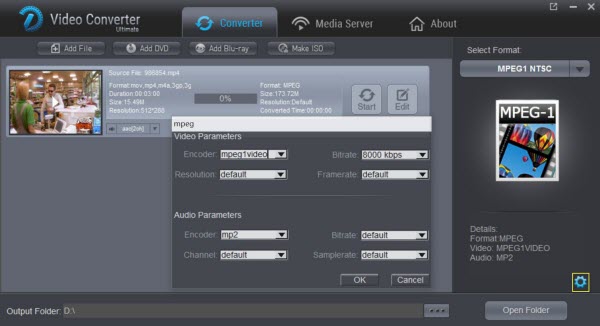
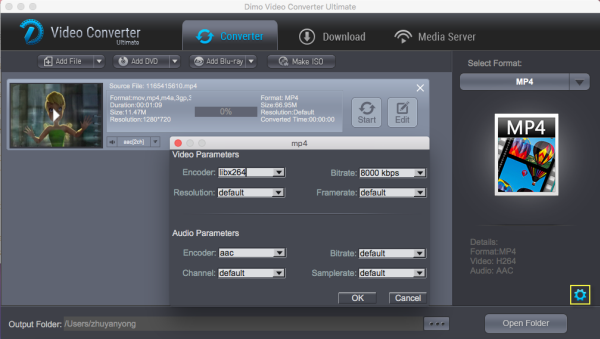
Tip: For more control, you can enter the "Settings" button to adjust the video and audio parameters like video codec, audio codec, bit rate, frame rate, sample rate, video size, etc. For novices, you can ignore these since the default settings produces a great result.


Step 3: After all settings, click the "Start" button to get the iMovie to MP4 video conversion started. Wait for the application to convert the iMovie file you imported to MP4 (H.264/MPEG-4 AVC/H.265). A little blue bar will appear showing the progress of the operation. The conversion process time may take a few minutes or hours, vary depending on the size of iMovie videos and quality you choose for the MP4 files.

When the conversion is complete, you can click "Open Folder" to find the videos that have converted directly for better use on your mobile devices or MP4 players.

Note: For some bizarre reason, you've probably encountered issue that you have some of mp4 videos that you really like, but the format restricts the ways you can use it on Mac applications. In that case, you will want to convert from MP4 to other file type. The top Mac MP4 video converter - Dimo Video Converter Ultimate for Mac will achieve the conversion too.

Free Download or Purchase Dimo Video Converter Ultimate for Mac/Win:


Kindly Note:

The price of Dimo Video Converter Ultimate for Mac is divided into 1 Year Subscription, Lifetime/Family/Business License: $43.95/Year; $45.95/lifetime license; $95.95/family license(2-4 Macs); $189.95/business pack(5-8 Macs). Get your needed one at purchase page.

Related Software:

BDmate (Mac/Win)

Lossless backup Blu-ray to MKV with all audio and subtitle tracks; Rip Blu-ray to multi-track MP4; Convert Blu-ray to almost all popular video/audio formats and devices; Copy Blu-ray to ISO/M2TS; Share digitized Blu-ray wirelessly.

DVDmate (Mac/Win)

A professional DVD ripping and editing tool with strong ability to remove DVD protection, transcode DVD to any video and audio format, and edit DVD to create personal movie.

Videomate (Mac/Win)

An all-around video converter software program that enables you to convert various video and audio files to formats that are supported by most multimedia devices.

8K Player (Mac/Win)

A mixture of free HD/4K video player, music player, Blu-ray/DVD player, video recorder and gif maker. 

Related Articles:
Source: How to Export/Convert iMovie to MP4

Friday, April 7, 2017

Importing MKV files into Adobe Premiere Pro CC/CS6/CS5

While looking to edit some MKV movies (ripped with MakeMKV, download from online or from other source), the only problem is that NLE like Adobe Premiere Pro won't import MKV files directly, and you may come across lots of problems, such as nothing shows up on the screen, or there is only image or you only get sound in Premiere Pro. If you're having trouble editing MKV files in Premiere Pro CC (2017), CS6, CS5, etc., just read on for details.


Actually, Adobe Premiere Pro supported video formats do not include MKV format. So what's the best way to resolve the MKV and PPro incompatibility issue? Well, as we've found out yet, the easy workaround is to transcode MKV to a more editing-friendly format, such a Premiere Pro's MOV or MPEG-2 codec. with Dimo Video Converter Ultimate for Mac.

It's an optimal MKV converter that helps you decode MKV files when converting into a different, and ideally more edit friendly format for Premiere Pro. So you can edit MKV footage with Premiere Pro CC/CS6/CS5 without any issue. Beside, this video convert program can also help to convert MKV to Avid Media Composer, Final Cut Pro, iMovie, FCE, etc. Plus, with the built-in video editing feature of the program, you can trim, crop, add watermark, set effect and more to your video files so as to bring you a wonderful home movie as you want. If you want to transcode MKV to Premiere Pro on Windows, please turn to Dimo Video Converter Ultimate. Now download the software and follow the steps to re-encode .mkv to Premiere Pro for editing.

Free Download Dimo Video Converter Ultimate for Mac/Win:


How to Successfully Import MKV into Premiere Pro CC/CS6/CS5

Step 1: Import MKV files

Run MKV to Premiere Converter for Mac and load source MKV clips to it. You can import MKV clips to the program through "Add File" button. You can also directly drag the video files into the program directly. Not only MKV file, but also MP4, AVI, VOB, WMV, FLV, etc are supported. Batch conversion is supported by the latest 3.0.0 version, so you can load more than one file to save time.


Step 2: Choose Premiere Pro preferred format

Click "Select Format" pull down list to select "Editor > Adobe Premiere" as the best video format for Premiere Pro. WMV, MPEG-2 formats from "Format > Video" are the good choice as well.

Tip -Profile Settings: In case the default settings do not fit your requirement, you can click "Settings" button and enter "Profile Settings" panel to adjust video size, bit rate, frame rate, sample rate and audio channels.


Step 3: Start conversion

Click "Start" button to start convert MKV for importing to Premiere Pro CC/CS6/CS5. When the conversion task is finished, click "Open" button to get the exported files.

Step 4: Import converted MKV files into Premiere Pro

You're now ready to get the result files into Adobe Premiere Pro to do further editing. Launch Premiere Pro on your Mac, choose "File > Import" to import any file. If you prefer to use keyboard shortcuts, press Command+I to open the standard Import dialog.

Free Download or Purchase Dimo Video Converter Ultimate for Mac/Win:


Kindly Note:

The price of Dimo Video Converter Ultimate for Mac is divided into 1 Year Subscription, Lifetime/Family/Business License: $43.95/Year; $45.95/lifetime license; $95.95/family license(2-4 Macs); $189.95/business pack(5-8 Macs). Get your needed one at purchase page.

Related Software:

BDmate (Mac/Win)

Lossless backup Blu-ray to MKV with all audio and subtitle tracks; Rip Blu-ray to multi-track MP4; Convert Blu-ray to almost all popular video/audio formats and devices; Copy Blu-ray to ISO/M2TS; Share digitized Blu-ray wirelessly.

DVDmate (Mac/Win)

A professional DVD ripping and editing tool with strong ability to remove DVD protection, transcode DVD to any video and audio format, and edit DVD to create personal movie.

Videomate (Mac/Win)

An all-around video converter software program that enables you to convert various video and audio files to formats that are supported by most multimedia devices.

8K Player (Mac/Win)

A mixture of free HD/4K video player, music player, Blu-ray/DVD player, video recorder and gif maker. 

Contact us or leave a message at Facebook if you have any issues.

Related Articles:

Tuesday, April 4, 2017

AVI to FCP: How to Import AVI to FCP on Mac (macOS Sierra Included)

Have problems importing AVI files to FCP for editing? This tutorial will show you what's the simple solution to fix the problem. After converting AVI to FCP supported format, you can freely edit all kinds of AVI videos on Final Cut Pro X/7/6 at will.


Normally, Final Cut Pro (FCP X included) can recognize some AVI files from cams. There are some instances, however, that importing an .avi file into Final Cut Pro doesn't go successfully. In fact, Final Cut Pro only reads AVI that both the audio and the video were compressed by using a codec that FCP can recognize. If your AVI video files are not imported, it's because of the codec used to create the AVI file is not supported by Final Cut Pro. 

If you want to edit AVI in FCP, the easy option would be adjusting those unsupported AVI to a more editing-friendly format, such an FCP's Apple Prores codec by using Dimo Video Converter Ultimate for Mac, which support all regular format, including but not limited to Apple Prores, AIC, DNxHD, MOV, FLV, MP4, M4V, MPG, etc. After AVI files are converted, you can import to FCP without any hassle. 

By running it, there's no need to set the codec by yourself: the Mac program has three optimized presets for FCPiMovieAvid MCAdobe Premiere, etc.. If you're using Windows users, please get Dimo Video Converter Ultimate which can also create FCP native Prores codec. Just get the right program and follow the step-by-step guide to transcode AVI for editing in Final Cut Pro X/7/6.

Free Download Dimo Video Converter Ultimate for Mac/Win:


>> Alternative video converter tool you may need

Videomate (Mac/Win)

An all-around video converter software program that enables you to convert various video and audio files to formats that are supported by most NLE, multimedia devices and media players.

How to Convert AVI and Import AVI to Final Cut Pro X/7/6

Note: If you are also a FCP X user, before you try to do the conversion, don't forget to make sure that you have installed the Apple ProRes Codec manually since the FCP X asks users to install it by themselves.

Step 1: Load AVI files to the program

Launch the AVI to FCP Converter and click "Add File" button to locate the .avi file(s) you want to add. Batch video conversion is supported in the latest upgraded version.


Step 2: Select output format

When it comes to choosing the output format for these target videos, you directly one choose "Editor >Final Cut Pro" preset. For compression, Apple ProRes 422 will do fine for keeping the original AVI quality the same and creating a Final Cut friendly file format. Apple has made a few variations to the ProRes family - use ProRes 422(Proxy) or (LT) for smaller file sizes (Applied to FCP 7 and above version).

Step 3 (Optional): Adjust the video, audio settings

Click "Settings" to fix the frame rate, bitrate, video size, etc to your needs. If you want to edit in Final Cut without having to render the clips while editing, all the frame sizes must be the same as the sequence settings. You can save a lot of render time by making all the clips the same size with this Mac AVI converter.


Step4: Start AVI to ProRes conversion on Mac

Click the big "Start" button at the bottom right corner to finish transcoding AVI to ProRes for FCP. When the conversion is done, you can find the output files by clicking "Open" button on the main interface, then you can transfer the encoded AVI files to your Final Cut Pro X, FCP 7 or 6 to edit with ease. Once you've got your video edited, you can export to any codec/container that you'd like for playing and sharing.

Free Download or Purchase Dimo Video Converter Ultimate for Mac/Win:


Kindly Note:

The price of Dimo Video Converter Ultimate for Mac is divided into 1 Year Subscription, Lifetime/Family/Business License: $43.95/Year; $45.95/lifetime license; $95.95/family license(2-4 Macs); $189.95/business pack(5-8 Macs). Get your needed one at purchase page.

Related Software:

BDmate (Mac/Win)

Lossless backup Blu-ray to MKV with all audio and subtitle tracks; Rip Blu-ray to multi-track MP4; Convert Blu-ray to almost all popular video/audio formats and devices; Copy Blu-ray to ISO/M2TS; Share digitized Blu-ray wirelessly.

DVDmate (Mac/Win)

A professional DVD ripping and editing tool with strong ability to remove DVD protection, transcode DVD to any video and audio format, and edit DVD to create personal movie.

Contact us or leave a message at Facebook if you have any issues.

Related Articles:
Source: How to Make AVI files Work in Final Cut Pro X and FCP 6/7

Saturday, April 1, 2017

Transcode and Import DJI Mavic Pro 4K videos to FCP 7/X

DJI is one of the leading drone manufacturers to put cameras in the sky and their amazingly capable Mavic Pro is one of the easiest drones to take to the sky. Speaking of the camera, the Mavic Pro houses a camera capable of recording high-resolution 4K videos at 30 fps in MOV wrapper encoded with MPEG-4 AVC/H.264. After recording some stunning 4K footage by DJI Mavic Pro, you may wanna edit these 4K videos in Final Cut Pro so as to make them more stylish. However, when you import DJI Mavic Pro 4K in FCP X/7/6, things get a bit complex. So, here offers an easy workaround to help you work with Mavic Pro 4K files in FCP on macos Sierra smoothly. 


It is a pity that Apple's Final Cut Pro- FCP X (below 10.2 version), FCP 7 hardly supports 4K files from Mavic Pro. If you want to have a smooth DJI Mavic Pro 4K to FCP workflow, you are advised to convert Mavic Pro 4K video to ProRes in 1080p settings for further editing in FCP 6/7 and Final Cut Pro X at first. 

With the help of Dimo Video Converter Ultimate for Mac, you can easily achieve the goal. With the professional 4K video converter for Mac, you can effortlessly encode DJI Mavic Pro 4K MP4/MOV footage for smoothly importing and editing in various non-linear editing systems (NLEs), including FCP, Adobe Premiere Pro, Avid Media Composer, Premiere Pro, iMovie, Davinci Resolve and more. 

Free Download Dimo Video Converter Ultimate for Mac/Win:


Besides, this 4K Video Converter is also available to customize the output resolutions to any size like 1080p, 2K, 4K as users want. More than that, this software also can deal with other video formats such as H.265, MKV, MTS, MXF, XAVC, FLV .etc on Mac OS X including macOS Sierra, El Capitan Yosemite, Mavericks, Lion and even free download online videos from YouTube, Instagram, Twitter for editing and playing. Now, download the software on computer and follow the guide below to start conversion.


>> Alternative video converter tool you may need

Videomate (Mac/Win)

An all-around video converter software program that enables you to convert various video and audio files to formats that are supported by most NLE, multimedia devices and media players.

Converting DJI Mavic Pro 4K video to work in FCP

Note: If you are also a FCP X user, before you try to do the conversion, don't forget to make sure that you have installed the Apple ProRes Codec manually since the FCP X asks users to install it by themselves.

Step 1: Run the DJI video converting program you just set up. Drag and drop the 4K files from Mavic Pro which are copied to Mac hard drive to the converter. You can also hit "Add File" button to import videos to the app.


Step 2: Choose output format > Click "Select Format" bar and choose "Editor > Final Cut Pro X or Final Cut Pro 7" as output format for editing raw 4K in FCP with natively supported video codec.

Step 3: Advanced V/A settings > Click "Settings" button if you'd like to customize advanced audio and video parameters like Video Codec, aspect ratio, bit rate, frame rate, Audio codec, sample rate, audio channels.


Note: Gnerally, 1080p is the optinal setings for FCP editing, so you can downscale 4K to 1080p. Of course, if you want to stick with the orignal 4K resolution, just keep the orignal video size.

Step 4: Start converting Mavic Pro 4K footage to FCP > Hit the "Start" button of the best 4K Video Converter for Mac. It will start converting DJI Mavic Pro 4K for importing to Final Cut Pro immediately. Soon after the conversion, just click "Open" button to get the generated files for natively editing in FCP 6/7 or FCP X for editing perfectly.

Tip: What to do after editing work in your FCP with Dimo

This DJI 4K video converter for macos Sierra can not only transcode 4K videos for FCP, but also convert FCP exported videos in different formats like MP4, AVI, MKV, MOV, FLV, etc., playback with 8K Player for Mac and share them onto mobile devices for watching wirelessly. Better still, you can make ISO for backup from your edited videos.

Free Download or Purchase Dimo Video Converter Ultimate for Mac/Win:


Kindly Note:

The price of Dimo Video Converter Ultimate for Mac is divided into 1 Year Subscription, Lifetime/Family/Business License: $43.95/Year; $45.95/lifetime license; $95.95/family license(2-4 Macs); $189.95/business pack(5-8 Macs). Get your needed one at purchase page.


Related Software:

BDmate (Mac/Win)

Lossless backup Blu-ray to MKV with all audio and subtitle tracks; Rip Blu-ray to multi-track MP4; Convert Blu-ray to almost all popular video/audio formats and devices; Copy Blu-ray to ISO/M2TS; Share digitized Blu-ray wirelessly.

DVDmate (Mac/Win)

A professional DVD ripping and editing tool with strong ability to remove DVD protection, transcode DVD to any video and audio format, and edit DVD to create personal movie.

Contact us or leave a message at Facebook if you have any issues.

Related Articles:
Source: How to Edit DJI Mavic Pro 4K in FCP (X) Natively?

Wednesday, March 29, 2017

How to Convert MP4 for Editing in Windows Movie Maker

You can make your movies differently by editing them on Windows Movie Maker, but not all file types will work when you try to use them. Some movies, like MP4 files which are downloaded from free sites, recorded from cameras, or iPhone, iPad, Blackberry, Android phone, are not recognizable on Movie Maker. 


In fact, Windows Movie Maker supports a small amount of video formats including ASF, AVI, WMV, MPEG-1, MPEG, MPG, M1V, MP2, MPV2, WM, MPE, etc. and MP4 is not included, that's why "every time when you import MP4 to Windows Movie Maker or Windows Live Movie Maker, it stops working". If you are mired in the mess, read on to find out the solution to edit MP4 files in Windows Movie Maker in a smooth way.

Don't let that format issue stop you from showing your creativity. To make MP4 files compatible with Windows Movie Maker, you'll just convert MP4 to Windows Movie Maker supported formats like WMV or AVI. Now I share the guide with you how to convert MP4 to Windows Movie Maker friendly format using Dimo Video Converter Ultimate

With it, you can effortlessly transcode MP4 files for smoothly importing and editing in various non-linear editing systems (NLE), including Movie Maker, Pinnacle StudioAdobe Premiere Pro, Cyberlink PowerDirector, Avid Studio, Magix Movie Edit Pro, Sony Vegas Pro and more retaining high quality. Besides MP4, you can almost convert all video files like MKV, AVI, VOB, TiVo, MTS, MOV, MXF, etc. for editing in Windows Movie Maker smoothly. Now download it and follow the steps below to complete your task.

Free Download Dimo Video Converter Ultimate (Win/Mac):


Convert and Import MP4 videos into Windows Movie Maker  

Step 1: Add MP4 files

Install and launch the MP4 video converter for Movie Maker, and then click "Add File" button to import your MP4 files to the software.


Step 2: Choose output format

Click "Select Format" bar and choose "Editor > Movie Maker" as output format on the drop-down menu of "Select Format". Of course, you can also choose AVI, WMV from "Format > Video" as the output format.

Tip: Click the Settings icon to adjust video and audio parameters on the Profile Setting as you need to get the best quality video.


Step 3: Convert MP4 to Windows Movie Maker

Simply click the "Start" button to start converting to make MP4 video clips compatible with WMM and everything else will be automated. You're done. Now your MP4 files will be converted into WMV or AVI video files ready to be imported to Windows Movie Maker as well as Windows Live Movie Maker.

Step 4: Import MP4 to Windows Movie Maker

Depending on your version of Windows Movie Maker or Windows Live Movie Maker, the buttons are slightly different:

Import MP4 video to Windows Movie Maker: When the conversion complete, open Windows Movie Maker and click Import or Import Video on the left to import your video to the movie collection and drag and drop to the timeline for editing.

Import MP4 video to Windows Live Movie Maker: Start Windows Live Movie Maker and go to Home tab in the ribbon menu and click Add video in the Add panel to locate the converted MP4 video.

Now start working with MP4 files in Windows Movie Maker beautifully. After that, you can save the output WLMP files to AVI/MP4 or even share them onto mobile devices wirelessly.

Related Software:

BDmate (Mac/Win)

Lossless backup Blu-ray to MKV with all audio and subtitle tracks; Rip Blu-ray to multi-track MP4; Convert Blu-ray to almost all popular video/audio formats and devices; Copy Blu-ray to ISO/M2TS; Share digitized Blu-ray wirelessly.

DVDmate (Mac/Win)

A professional DVD ripping and editing tool with strong ability to remove DVD protection, transcode DVD to any video and audio format, and edit DVD to create personal movie.

Videomate (Mac/Win)

An all-around video converter software program that enables you to convert various video and audio files to formats that are supported by most multimedia devices.

8K Player (Mac/Win)

A mixture of free HD/4K video player, music player, Blu-ray/DVD player, video recorder and gif maker. 

Free Download or Purchase Dimo Video Converter Ultimate:


Kindly Note:

The price of Dimo Video Converter Ultimate for Windows is divided into 1 Year Subscription, Lifetime/Family/Business License: $43.95/Year; $45.95/lifetime license; $95.95/family license(2-4 PCs); $189.95/business pack(5-8 PCs). Get your needed one at purchase page.

Contact us or leave a message at Facebook if you have any issues.

Related Articles:
Source: Convert MP4 movie for using in Windows Movie Maker

Sunday, March 26, 2017

Loading MP4 to Camtasia Studio 9/8/7 for editing

You would handle kinds of video files daily, including YouTube MP4 videos, Sony MP4 Camcorder videos(XDCam-EX), GoPro MP4 footage, game MP4 recordings with OBS(Open Broadcaster Software), etc. And in order to get more wonderful videos, you probably will choose to edit .mp4 files with Camtasia which is a good option your screen and edit your videos to get professional-like videos before sharing to YouTube or FaceBook. While, there are dozen of .mp4 files can't be imported into Camtasia software, for the complex video codec of MP4 files. This article will be along with you to root the trouble and solution out here.


Some people including you may be confused: Camtasia says it supports MP4 at Techsmith support site, but why I can't import MP4 to Camtasia Studio? Well, that's because Camtasia prefers AVC/h.264 at no more than 30 frames per second instead of others while MP4 can contain various video codecs. So if you MP4 files are not accepted by Camtasia Studio, it's probably because of the video codec incompatibility.

To fix the problem, you'll need to convert those MP4 to a more editing-friendly format for Camtasia Studio with a MP4 file converter app. Dimo Video Converter Ultimate which is an easy-to-use MP4 converter for you, which can help you change MP4 into a Camtasia Studio accepted MPEG-1/MOV/MP4 with least quality loss. You should then be able to import the new file into Camtasia Studio with smooth editing without any trouble. 

The all-in-one and easy-to-use toolkit can convert all other popular video formats like AVI, MOVMXF, WMV, MKV, FLV, ASF, M2TS, VOB, etc. to Camtasia Studio natively supported video formats on Windows (Windows 10 included) with fast encoding speed. For Mac users, just get Dimo Video Converter Ultimate for Mac to get th job done. See how below about converting MP4 files to Camtasia Studio format.

Free Download Dimo Video Converter Ultimate (Win/Mac):


How to Convert MP4 files for Editing in Camtasia Studio 9/8/7

Step 1. Load .MP4 files

Drag & drop MP4 files to the program directly. Or go to the "Add file" to locate the MP4 files you want to add. You can add several files to do conversion at the same time.


Step 2. Select the output format

Click "Select Format" bar and then move your pointer to "Format" and turn to "HD Video" or "Video" and choose MPEG-1 or MOV as target format. Besides, you can also choose AVI, WMV, MP4, etc. if you want to get a relatively smaller output file.

Step 3 (optional): Adjust the video, audio settings

Click "Settings" to fix the frame rate, bitrate, video size, etc to your needs. If you want to edit in Camtasia Studio without having to render the clips while editing, all the frame sizes must be the same as the sequence settings. You can save a lot of render time by making all the clips the same size with this MOV video converter.


Tip: Furthermore, you are provided some useful edit functions cropping, trimming, adding watermark, adjusting effects for pre-editing your video files so that you can simplify your Camtasia Studio editing.

Step 3. Start MP4 to Camtasia Studio conversion 

Click the "Start" button to start the MP4 to Camtasia conversion. Just in a few minutes, you make it.

Step 4. Import MP4 into Camtasia Studio

After the conversion, click "Open" to locate the result videos and then launch Camtasia Studio and click "Import media" import the converted MP4 video into Camtasia Studio; prepare for editing. You will find that it's just a piece of cake to edit MP4 files in Camtasia Studio. 

After editing or recording, you can export video toCamtasia Studio for playing and sharing.

Free Download or Purchase Dimo Video Converter Ultimate:


Kindly Note:

The price of Dimo Video Converter Ultimate for Windows is divided into 1 Year Subscription, Lifetime/Family/Business License: $43.95/Year; $45.95/lifetime license; $95.95/family license(2-4 PCs); $189.95/business pack(5-8 PCs). Get your needed one at purchase page.

Contact us or leave a message at Facebook if you have any issues.

Related Articles:
Source: Camtasia MP4 Tutorial- Import MP4 to Camtasia Studio