Panasonic GH5 delivers the highest quality with 4K in mp4 or mov format. Whereas, if you import Panasonic GH5 4K videos into iMovie, users always encounter video and audio problems, as the H.264 codec from GH5 is efficient, but simply isn't designed for editing. In addition, although iMovie has boasted the capacity to handle with 4K files without much problem, it is extremely hardware intensive especially for working on a old computer. So, before transferring Panasonic GH5 4K files to iMovie, you'd better convert GH5 4K MP4/MOV to 1080p AIC for smooth editing.
Along with some help from a top 4K video converter like Dimo Video Converter Ultimate for Mac, it can be done quickly and easily. It is capable of converting Panasonic GH5 MP4/MOV to Prores, AIC, DNxHD, MOV/MPEG-2 for smoothly importing and editing in various non-linear editing systems (NLE), including iMovie 08/09/11, FCP 6/7/X, DaVinci Resolve 9/10/11/12, Avid Media Composer 5.5/6.0/6.5/7/8, Adobe Premiere Pro and more.
If iMovie or other NLEs is hard to handle your 4K files, with this tool you can downscale 4K to 1080p effortlessly. Below is how. Just take a look at the brief guide below.
Free Download Dimo Video Converter Ultimate for Mac/Win:
 Other Download:
Step 1: Load the Panasonic GH5 4K videos to the program
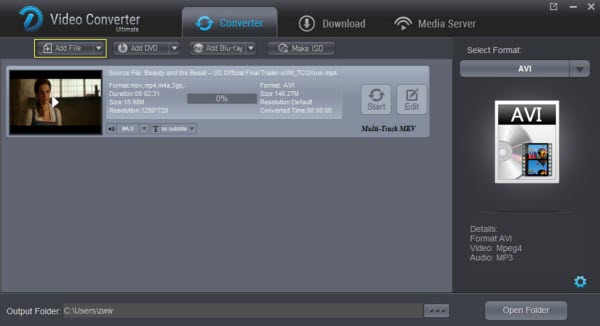
Download and install the 4K Video Converter, and then import the GH5 4K mp4 or mov files to it. To do so, you can directly drag & drop the files onto the main interface, or you can click the "Add File" icon to locate the videos from your local disk.
Other Download:
Step 1: Load the Panasonic GH5 4K videos to the program
Download and install the 4K Video Converter, and then import the GH5 4K mp4 or mov files to it. To do so, you can directly drag & drop the files onto the main interface, or you can click the "Add File" icon to locate the videos from your local disk.
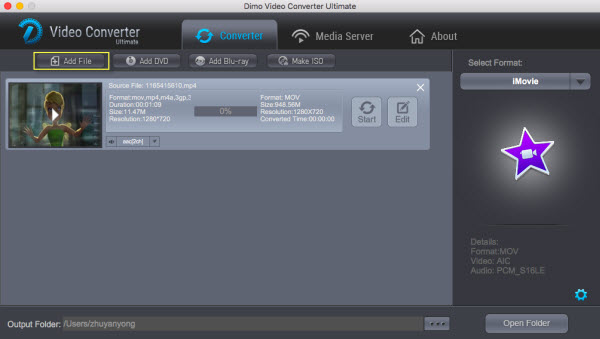 Step 2: Set output video format
Click the Format column to select output format "Editor> Moive" as the best compatible video format for editing 4K in iMovie.
Tips: Hit the Settings icon, start to adjust the video and audio parameters, including the Bitrate of Video & Audio, Video Size, Sample Rate, Frame Rate, Audio Channels, etc.
Step 2: Set output video format
Click the Format column to select output format "Editor> Moive" as the best compatible video format for editing 4K in iMovie.
Tips: Hit the Settings icon, start to adjust the video and audio parameters, including the Bitrate of Video & Audio, Video Size, Sample Rate, Frame Rate, Audio Channels, etc.
 Step 3: Begin to convert Panasonic GH5 4K videos to iMovie
Hit Start button to get 4K to iMovie conversion. Once it finished, you can click Start to get the output files. Now it would be an easy task to import and work Panasonic GH5 4K footage in iMovie 08, 09, 11, iMovie HD on Mac(macOS Sierra included).
Step 3: Begin to convert Panasonic GH5 4K videos to iMovie
Hit Start button to get 4K to iMovie conversion. Once it finished, you can click Start to get the output files. Now it would be an easy task to import and work Panasonic GH5 4K footage in iMovie 08, 09, 11, iMovie HD on Mac(macOS Sierra included).
 Free Download or Purchase Dimo Video Converter Ultimate for Mac/Win:

 Kindly Note:The price of Dimo Video Converter Ultimate for Mac is divided into 1 Year Subscription, Lifetime/Family/Business License: $43.95/Year; $45.95/lifetime license; $95.95/family license(2-4 Macs); $189.95/business pack(5-8 Macs). Get your needed one at purchase page.
Related Software:
BDmate (Mac/Win)
Lossless backup Blu-ray to MKV with all audio and subtitle tracks; Rip Blu-ray to multi-track MP4; Convert Blu-ray to almost all popular video/audio formats and devices; Copy Blu-ray to ISO/M2TS; Share digitized Blu-ray wirelessly.
DVDmate (Mac/Win)
A professional DVD ripping and editing tool with strong ability to remove DVD protection, transcode DVD to any video and audio format, and edit DVD to create personal movie.
Videomate (Mac/Win)
An all-around video converter software program that enables you to convert various video and audio files to formats that are supported by most multimedia devices.
8K Player (Mac/Win)
A mixture of free HD/4K video player, music player, Blu-ray/DVD player, video recorder and gif maker.
Contact us or leave a message at Facebook if you have any issues.
Related Articles:
Source: Transcode Panasonic GH5 4K to iMovie for Editing
Kindly Note:The price of Dimo Video Converter Ultimate for Mac is divided into 1 Year Subscription, Lifetime/Family/Business License: $43.95/Year; $45.95/lifetime license; $95.95/family license(2-4 Macs); $189.95/business pack(5-8 Macs). Get your needed one at purchase page.
Related Software:
BDmate (Mac/Win)
Lossless backup Blu-ray to MKV with all audio and subtitle tracks; Rip Blu-ray to multi-track MP4; Convert Blu-ray to almost all popular video/audio formats and devices; Copy Blu-ray to ISO/M2TS; Share digitized Blu-ray wirelessly.
DVDmate (Mac/Win)
A professional DVD ripping and editing tool with strong ability to remove DVD protection, transcode DVD to any video and audio format, and edit DVD to create personal movie.
Videomate (Mac/Win)
An all-around video converter software program that enables you to convert various video and audio files to formats that are supported by most multimedia devices.
8K Player (Mac/Win)
A mixture of free HD/4K video player, music player, Blu-ray/DVD player, video recorder and gif maker.
Contact us or leave a message at Facebook if you have any issues.
Related Articles:
Source: Transcode Panasonic GH5 4K to iMovie for Editing
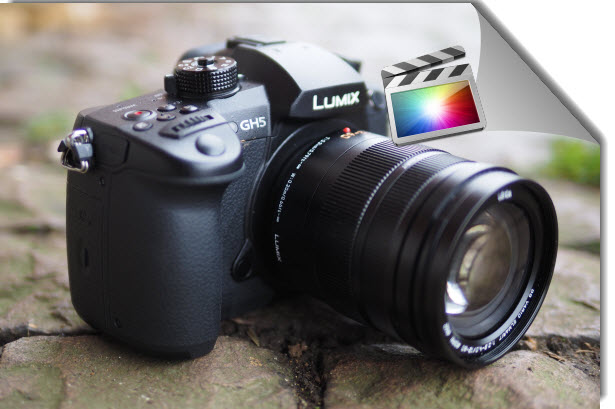
Lumix GH5 is the latest in the line of Panasonic's top-of-the-range GH series of mirrorless cameras, which over years have carved out a niche for themselves among videographers thanks to their breadth of movie-making features. As one of the best 4K camera solutions, the Lumix GH5 allows you to shoot Cinema 4K (4096 x 2160) at 60p with a bit rate of 150Mbps. Tring to record some stunning 4K footage by GH5, and ready to edit these 4K videos from Panasonic GH5 in Final Cut Pro (FCP X, FCP 7, FCP 6) so as to make them more stylish? However, there are some problems such as not showing the video but audio only, unsupported file type when playing & editing Panasonic GH5 video in FCP especially in 4K. So, how to import Panasonic GH5 4K video to Final Cut Pro (FCP X, FCP 7, FCP 6) on MacOS (Sierra) beautifully?
 To transcode Panasonic GH5 4K MP4/MOV footage for editing in FCP, you're highly recommended to use Dimo Video Converter Ultimate for Mac. By running it, there's no need to set the codec by yourself: the Mac program has a optimized preset for Final Cut Pro (FCP X, FCP 7). Besides Final Cut Pro, this program can also export DNxHD for Avid, Apple ProRes for Final Cut Pro, Apple InterMediate Codec for iMovie and more NLE systems for editing.
For Windows users, Dimo Video Converter Ultimate is the alternative choice, which supports converting Panasonic GH5 4K MP4 to FCP supported file format in Windows (Windows 10 included). Just get the right program according to your system and follow the steps below to learn how to get Panasonic GH5 4K footage support in Final Cut Pro.
To transcode Panasonic GH5 4K MP4/MOV footage for editing in FCP, you're highly recommended to use Dimo Video Converter Ultimate for Mac. By running it, there's no need to set the codec by yourself: the Mac program has a optimized preset for Final Cut Pro (FCP X, FCP 7). Besides Final Cut Pro, this program can also export DNxHD for Avid, Apple ProRes for Final Cut Pro, Apple InterMediate Codec for iMovie and more NLE systems for editing.
For Windows users, Dimo Video Converter Ultimate is the alternative choice, which supports converting Panasonic GH5 4K MP4 to FCP supported file format in Windows (Windows 10 included). Just get the right program according to your system and follow the steps below to learn how to get Panasonic GH5 4K footage support in Final Cut Pro.
Free Download Dimo Video Converter Ultimate for Mac/Win:
Step 1: Add original Panasonic GH5 4K file
Click "Add File" button to import Panasonic GH5 4K MP4 videos to this powerful program. Or you can simply drag the videos directly to the software window list.
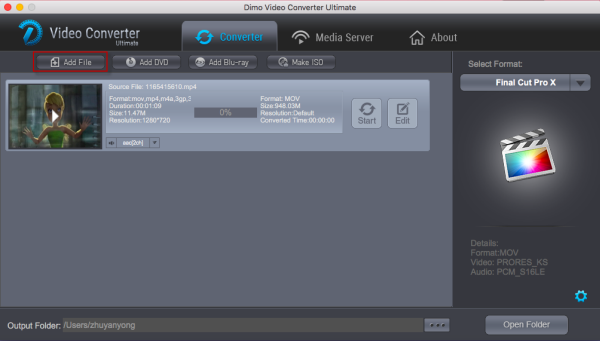 Step 2: Choose preferred format
Click "Select Format" pull down list to select "Editor > Final Cut Pro" as best video format for Final Cut Pro.
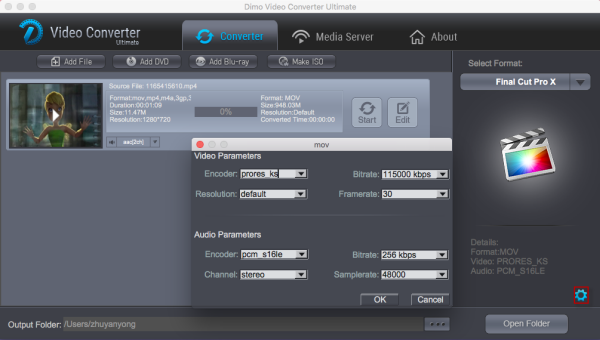
Tip 1: Click the "Settings" button, you are able to enter the "Profile Settings" panel to adjust video and audio parameters for the converted files, including video size, bit rate, frame rate and more. Here personally I recommend you to set the video size as 1920*1080p for better editing. Of course, if you want to get original 4K resolution, just keep the video size as original.
Step 2: Choose preferred format
Click "Select Format" pull down list to select "Editor > Final Cut Pro" as best video format for Final Cut Pro.
Tip 1: Click the "Settings" button, you are able to enter the "Profile Settings" panel to adjust video and audio parameters for the converted files, including video size, bit rate, frame rate and more. Here personally I recommend you to set the video size as 1920*1080p for better editing. Of course, if you want to get original 4K resolution, just keep the video size as original.
 Tip 2: You can edit the 4K video from GH5 before transcoding to Final Cut Pro. Just click "Edit" button, you can trim, crop the video, or add watermark, adjust effect and creating 3D from the 2D videos which you will convert.
Step 3: Start conversion
Click the "Start" button to start transcoding Panasonic GH5 4K to Apple Prores for Final Cut Pro. Once the process is at 100%, click "Open" button on the main interface to find the generated videos for importing to FCP X/7/6.
In addition, this great Mac 4K video converter also allows you to fast share converted or edited MP4 file to from Mac or Win computer to mobile devices wirelessly, via its mature IP address sharing technology (i.e. Dimo Media Server). What's more, you can even convert edited videos export from editors into more popular formats. Congratulations! You have successfully taken the first step to make your own masterpiece.
Tip 2: You can edit the 4K video from GH5 before transcoding to Final Cut Pro. Just click "Edit" button, you can trim, crop the video, or add watermark, adjust effect and creating 3D from the 2D videos which you will convert.
Step 3: Start conversion
Click the "Start" button to start transcoding Panasonic GH5 4K to Apple Prores for Final Cut Pro. Once the process is at 100%, click "Open" button on the main interface to find the generated videos for importing to FCP X/7/6.
In addition, this great Mac 4K video converter also allows you to fast share converted or edited MP4 file to from Mac or Win computer to mobile devices wirelessly, via its mature IP address sharing technology (i.e. Dimo Media Server). What's more, you can even convert edited videos export from editors into more popular formats. Congratulations! You have successfully taken the first step to make your own masterpiece.
Free Download or Purchase Dimo Video Converter Ultimate for Mac/Win:
Kindly Note:
The price of Dimo Video Converter Ultimate for Mac is divided into 1 Year Subscription, Lifetime/Family/Business License: $43.95/Year; $45.95/lifetime license; $95.95/family license(2-4 Macs); $189.95/business pack(5-8 Macs). Get your needed one at purchase page.
Contact us or leave a message at Facebook if you have any issues.
Related Articles:
Source: Import Panasonic GH5 4K to FCP for Editing Smoothly
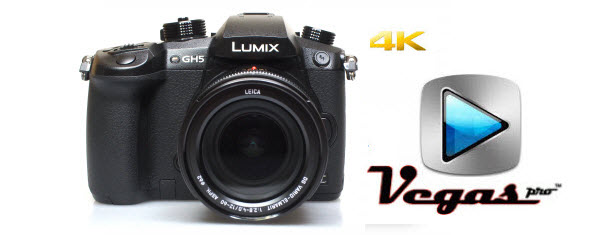
Panasonic GH5 has a couple of clever tricks up its sleeve especially the incredibly swift capture with 4K and 6K modes. However, when you want to have a project with the 4K recordings from Panasonic GH5 in Sony Vegas Pro, some problems would occur: missing codec, looped audio... If you're editing Panasonic GH5 4K MP4/MOV in Sony Vegas, keep reading to find your best way from this page.
 No worry, Dimo Video Converter Ultimate is best choice to get the work done. This is a smart tool specially designed for 4K footage users to preview and convert 4K recordings to your wanted video and audio formats, so as to smoothly add them into Sony Vegas, Premiere Pro, Adobe Premiere Elements, Avid Media Composer, Windows Movie Maker, Pinnacle Studio to do further editing.
This is a nice small video converter took kit that is capable of convert 4K to other formats with no quality loss. Plus, lots of video presets are provided for kinds of Android/Windows/iOS devices. It also features basic editing features such as trimming, rotating, cropping, watermarking, adding effecting, 3D creating. By using the trimming action you can clip a specific duration from a video clip and turn it into preferred format. Now just get the right version and follow the guide.
No worry, Dimo Video Converter Ultimate is best choice to get the work done. This is a smart tool specially designed for 4K footage users to preview and convert 4K recordings to your wanted video and audio formats, so as to smoothly add them into Sony Vegas, Premiere Pro, Adobe Premiere Elements, Avid Media Composer, Windows Movie Maker, Pinnacle Studio to do further editing.
This is a nice small video converter took kit that is capable of convert 4K to other formats with no quality loss. Plus, lots of video presets are provided for kinds of Android/Windows/iOS devices. It also features basic editing features such as trimming, rotating, cropping, watermarking, adding effecting, 3D creating. By using the trimming action you can clip a specific duration from a video clip and turn it into preferred format. Now just get the right version and follow the guide.
Free Download Dimo Video Converter Ultimate (Win/Mac):
Convert/Import Panasonic GH5 4K to Sony Vegas for smooth editing
Step 1: Load GH5 4K movie
Open up 4K to HD Video Converter as a professional GH5 4K video to Sony Vegas Converter. When its main interface pops up, click "Add File" to import your source files.
 2. Select output format
This converter provides a wide variety of formats as output. You can select a format that is natively supported by Sony Vegas Pro as target, such as "WMV" and "MOV" under "Video" column. Select "Format > Video".
3. Edit the videos (Optional)
Click the "Edit" button and edit your videos before processing format conversion. There are main seven functions available: Trim, Adjust, Watermark, Effect and 3D. When enter the edit > Trim interface, you should either drag the slider bar back and forth or set the start time and the end time for the video to get the part you want.
4. Do video/audio settings (Optional)
This converter looks to be a simple program until you see all the rather complex advanced options hidden away in the "Setting" button, where there has support of configuration for each of the variety of video formats and codecs.
2. Select output format
This converter provides a wide variety of formats as output. You can select a format that is natively supported by Sony Vegas Pro as target, such as "WMV" and "MOV" under "Video" column. Select "Format > Video".
3. Edit the videos (Optional)
Click the "Edit" button and edit your videos before processing format conversion. There are main seven functions available: Trim, Adjust, Watermark, Effect and 3D. When enter the edit > Trim interface, you should either drag the slider bar back and forth or set the start time and the end time for the video to get the part you want.
4. Do video/audio settings (Optional)
This converter looks to be a simple program until you see all the rather complex advanced options hidden away in the "Setting" button, where there has support of configuration for each of the variety of video formats and codecs.
 In addition to converting video, the program has presets from columns on the left side for dozens of popular devices like the iPad, iPhone, TV, VR and many more. Just select a preset and it will fill in all the settings for you accordingly.
5. Start the conversion
Click "Start" to begin converting video files. After the conversion, you will get the desired videos in the destination folder. After the conversion, click Open to get the output videos. Then, import or just drag and drop the converted 4K files to the timeline for easy editing.
Free Download or Purchase Dimo Video Converter Ultimate:
In addition to converting video, the program has presets from columns on the left side for dozens of popular devices like the iPad, iPhone, TV, VR and many more. Just select a preset and it will fill in all the settings for you accordingly.
5. Start the conversion
Click "Start" to begin converting video files. After the conversion, you will get the desired videos in the destination folder. After the conversion, click Open to get the output videos. Then, import or just drag and drop the converted 4K files to the timeline for easy editing.
Free Download or Purchase Dimo Video Converter Ultimate:

 Kindly Note:
The price of Dimo Video Converter Ultimate for Windows is divided into 1 Year Subscription, Lifetime/Family/Business License: $43.95/Year; $45.95/lifetime license; $95.95/family license(2-4 PCs); $189.95/business pack(5-8 PCs). Get your needed one at purchase page.
Kindly Note:
The price of Dimo Video Converter Ultimate for Windows is divided into 1 Year Subscription, Lifetime/Family/Business License: $43.95/Year; $45.95/lifetime license; $95.95/family license(2-4 PCs); $189.95/business pack(5-8 PCs). Get your needed one at purchase page.
Contact us or leave a message at Facebook if you have any issues.
Related Articles:
Source: Best Way to Edit Panasonic GH5 4K in Sony Vegas Pro
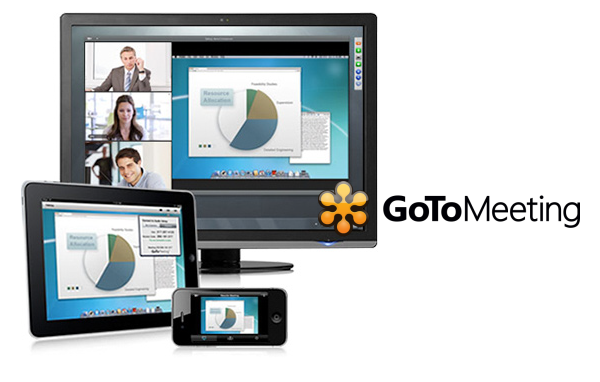
GoToMeeting is a powerful tool for those who want to meet with customers or colleagues through the Internet. And can record real-time meetings. However, GoToMeeting recorded video format is WMV and G2M3/G2M4 codec, can only play on their own platform. If you want to play GoToMeeting videos on popular devices like iPhone, iTunes, Samsung phone, Sony phone or share them on YouTube, you are supposed to convert them to MP4.
 For users who want to get the best quality of MP4 from GoToMeeting in a fast speed, without further ado, Dimo Video Converter Ultimate for Mac comes to the rescue. This software is an excellent video converter which is capable of converting GoToMeeting videos to MP4, MOV, AVI, FLV, MKV, MP3, AAC, AC3 and so on. It could save you a lot of troubles with its batch converting features With its easy-to-use design, it is a simple job to convert GoToMeeting videos to MP4.
Its built-in editor allows you to adjust the video effects for better visual enjoyment by trimming, cropping, splitting, adding watermark/effects. Moreover, you can download online videos from 300+ popular sites like YouTube, BBC, Vimeo, Facebook, etc. If you are the user of Windows computer, simply turn to Dimo Video Converter Ultimate. The guide below will tell you how to do it.
For users who want to get the best quality of MP4 from GoToMeeting in a fast speed, without further ado, Dimo Video Converter Ultimate for Mac comes to the rescue. This software is an excellent video converter which is capable of converting GoToMeeting videos to MP4, MOV, AVI, FLV, MKV, MP3, AAC, AC3 and so on. It could save you a lot of troubles with its batch converting features With its easy-to-use design, it is a simple job to convert GoToMeeting videos to MP4.
Its built-in editor allows you to adjust the video effects for better visual enjoyment by trimming, cropping, splitting, adding watermark/effects. Moreover, you can download online videos from 300+ popular sites like YouTube, BBC, Vimeo, Facebook, etc. If you are the user of Windows computer, simply turn to Dimo Video Converter Ultimate. The guide below will tell you how to do it.
Free Download Dimo Video Converter Ultimate for Mac/Win:
How to Convert GoToMeeting Video to MP4
Step 1. Load source files
Click on "Add File" to add your GoToMeeting videos to the program. Or you can directly drag the videos and drop them in the interface. You can add a bunch of videos in the program at the same time. Video Converter Ultimate works well on batch converting.
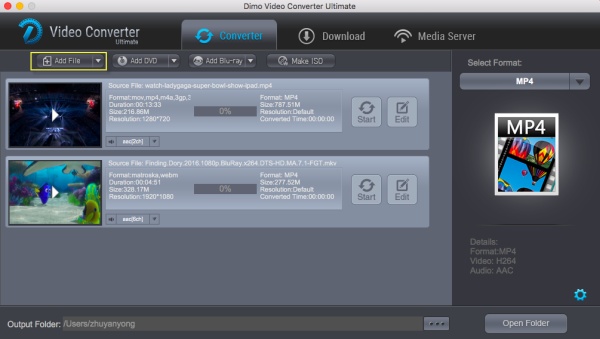 Step 2. Select output format
Click "Select Format" bar and select MP4 as the output format from "Format > Video" list. If you prefer high definition video, you can choose "HD MP4" from the "Format > HD Video" list. H.265 MP4 are also supported. The program also has device-presets that will convert video to the correct resolution and format and instantly forward them to popular devices such as iPhone, Samsung phone or Sony Playstation. So if you are willing to put the converted video to a certain media device, you can select the icon corresponding to the device in the presets list.
Tip: For more control, you can enter the "Settings" button to adjust the video and audio parameters like video codec, audio codec, bit rate, frame rate, sample rate, video size, etc. For novices, you can ignore these since the default settings produces a great result.
Step 2. Select output format
Click "Select Format" bar and select MP4 as the output format from "Format > Video" list. If you prefer high definition video, you can choose "HD MP4" from the "Format > HD Video" list. H.265 MP4 are also supported. The program also has device-presets that will convert video to the correct resolution and format and instantly forward them to popular devices such as iPhone, Samsung phone or Sony Playstation. So if you are willing to put the converted video to a certain media device, you can select the icon corresponding to the device in the presets list.
Tip: For more control, you can enter the "Settings" button to adjust the video and audio parameters like video codec, audio codec, bit rate, frame rate, sample rate, video size, etc. For novices, you can ignore these since the default settings produces a great result.
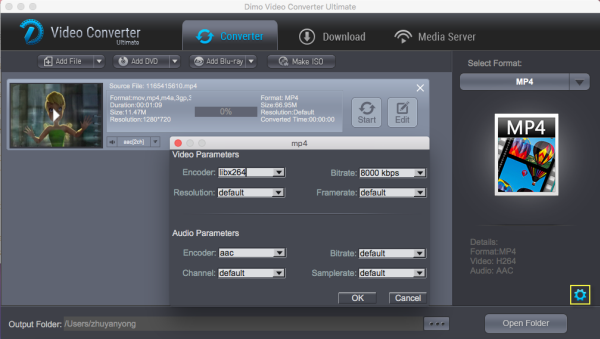 Tip 2: If the video clips you've recorded are still longer than your requirements then you could activate the build-in video editor in this video converter by click "Edit", so that you can choose to trim and split the movie into smaller parts with zero quality. Click the "Trim" icon in the main interface, and you can cut your files according to time length and file size.
Step 3. Start converting GoToMeeting recordings to MP4
After all settings, click the "Start" button to to start the GoToMeeting to MP4 conversion process. When the conversion is complete, you can click "Open Folder" to find the videos that have converted directly for better use on your mobile devices.
Free Download or Purchase Dimo Video Converter Ultimate for Mac/Win:
Kindly Note:
The price of Dimo Video Converter Ultimate for Mac is divided into 1 Year Subscription, Lifetime/Family/Business License: $43.95/Year; $45.95/lifetime license; $95.95/family license(2-4 Macs); $189.95/business pack(5-8 Macs). Get your needed one at purchase page.
Tip 2: If the video clips you've recorded are still longer than your requirements then you could activate the build-in video editor in this video converter by click "Edit", so that you can choose to trim and split the movie into smaller parts with zero quality. Click the "Trim" icon in the main interface, and you can cut your files according to time length and file size.
Step 3. Start converting GoToMeeting recordings to MP4
After all settings, click the "Start" button to to start the GoToMeeting to MP4 conversion process. When the conversion is complete, you can click "Open Folder" to find the videos that have converted directly for better use on your mobile devices.
Free Download or Purchase Dimo Video Converter Ultimate for Mac/Win:
Kindly Note:
The price of Dimo Video Converter Ultimate for Mac is divided into 1 Year Subscription, Lifetime/Family/Business License: $43.95/Year; $45.95/lifetime license; $95.95/family license(2-4 Macs); $189.95/business pack(5-8 Macs). Get your needed one at purchase page.
Contact us or leave a message at Facebook if you have any issues.
Related Articles:
Source: Method to Convert Recordings from GoToMeeting to MP4
VOB files usually exist on DVD discs, or are downloaded from movie sharing sites. As this kind of video file usually contains one or several audio tracks and subtitle tracks that are multiplexed together into one stream form, it is not so easy to playback directly on PC or Mac. That's why you find out that all VOB files in the Video_TS folder are just grayed out when you try to import VOB to Pinnacle Studio for editing. To edit VOB files in Pinnacle Studio (no matter Pinnacle Studio 18, 17.5, 17, 16, 15 or other verison), you have to convert VOB files to Pinnacle friendly format first. Pinnacle Studio work with AVI, WMV files perfectly.
 To get the work done, you can turn to Dimo Video Converter Ultimate to convert VOB to Pinnacle Studio supported AVI or MPG first. Overall, it's the optimal VOB converter for you, which can help you decode the VOB files when converting into a different, and ideally more edit friendly, compression format like AVI. So you can edit VOB clips with Pinnacle Studio smoothly.
Besides VOB, this video convert program can also help to convert between any popular video and audio formats as you need. Plus, with the built-in video editing feature of the program, you can trim, crop, add watermark and more to your video files. Just download it and follow the tutorial below to get VOB files and Pinnacle Studio to play nicely. If you are Mac user, please turn to Dimo Video Converter Ultimate for Mac.
To get the work done, you can turn to Dimo Video Converter Ultimate to convert VOB to Pinnacle Studio supported AVI or MPG first. Overall, it's the optimal VOB converter for you, which can help you decode the VOB files when converting into a different, and ideally more edit friendly, compression format like AVI. So you can edit VOB clips with Pinnacle Studio smoothly.
Besides VOB, this video convert program can also help to convert between any popular video and audio formats as you need. Plus, with the built-in video editing feature of the program, you can trim, crop, add watermark and more to your video files. Just download it and follow the tutorial below to get VOB files and Pinnacle Studio to play nicely. If you are Mac user, please turn to Dimo Video Converter Ultimate for Mac.
Free Download Dimo Video Converter Ultimate (Win/Mac):
How to Edit DVD VOB files in Pinnacle Studio
Step 1 Launch the program on your Mac. Click on the "Add File" button which is available on the bottom left side or drag and drop it.
 Step 2 After adding File in the software interface, select the output format AVI or any other format from the 150 available formats.
 Step 3 Now click on Start button to start VOB to Pinnacle Studio conversion, it will convert automatically and you can see these converted files in the output folder in some time.
Notes: The software can rip Blu-ray/DVD to devices and ediyor, like iPhone, HTC, Samsung, PR, Song Vegas Pro, iMove and so on. Then you can convert videos to MP4, FIV, MOV, WMV, MKV, MP3, Aiff, etc.
Free Download or Purchase Dimo Video Converter Ultimate:
Kindly Note:
The price of Dimo Video Converter Ultimate for Windows is divided into 1 Year Subscription, Lifetime/Family/Business License: $43.95/Year; $45.95/lifetime license; $95.95/family license(2-4 PCs); $189.95/business pack(5-8 PCs). Get your needed one at purchase page.
Related Software:
BDmate (Win/Mac)
Lossless backup Blu-ray to MKV with all audio and subtitle tracks; Rip Blu-ray to multi-track MP4; ConvertBlu-ray to almost all popular video/audio formats and devices; Copy Blu-ray to ISO/M2TS; Share digitized Blu-ray wirelessly.
DVDmate (Win/Mac)
A professional DVD ripping and editing tool with strong ability to remove DVD protection, transcode DVD to any video and audio format, and edit DVD to create personal movie.
Videomate (Win/Mac)
An all-around video converter software program that enables you to convert various video and audio files to formats that are supported by most multimedia devices.
8K Player (Win/Mac)
A mixture of free HD/4K video player, music player, Blu-ray/DVD player, video recorder and gif maker.
Contact us or leave a message at Facebook if you have any issues.
Related Articles:
Source: Editing DVD VOB files in Pinnacle Studio
Step 3 Now click on Start button to start VOB to Pinnacle Studio conversion, it will convert automatically and you can see these converted files in the output folder in some time.
Notes: The software can rip Blu-ray/DVD to devices and ediyor, like iPhone, HTC, Samsung, PR, Song Vegas Pro, iMove and so on. Then you can convert videos to MP4, FIV, MOV, WMV, MKV, MP3, Aiff, etc.
Free Download or Purchase Dimo Video Converter Ultimate:
Kindly Note:
The price of Dimo Video Converter Ultimate for Windows is divided into 1 Year Subscription, Lifetime/Family/Business License: $43.95/Year; $45.95/lifetime license; $95.95/family license(2-4 PCs); $189.95/business pack(5-8 PCs). Get your needed one at purchase page.
Related Software:
BDmate (Win/Mac)
Lossless backup Blu-ray to MKV with all audio and subtitle tracks; Rip Blu-ray to multi-track MP4; ConvertBlu-ray to almost all popular video/audio formats and devices; Copy Blu-ray to ISO/M2TS; Share digitized Blu-ray wirelessly.
DVDmate (Win/Mac)
A professional DVD ripping and editing tool with strong ability to remove DVD protection, transcode DVD to any video and audio format, and edit DVD to create personal movie.
Videomate (Win/Mac)
An all-around video converter software program that enables you to convert various video and audio files to formats that are supported by most multimedia devices.
8K Player (Win/Mac)
A mixture of free HD/4K video player, music player, Blu-ray/DVD player, video recorder and gif maker.
Contact us or leave a message at Facebook if you have any issues.
Related Articles:
Source: Editing DVD VOB files in Pinnacle Studio
Adobe After Effects CS software is the industry-leading solution for creating sophisticated motion graphics and cinematic visual effects. There must be some occasions when you want to import a clip or a scene from DVD into After Effects CC, CS6, CS5.5, CS5, CS4, etc. to make some modifications. Though AE normally can recognize a few file formats like DV, Flash, MPEG, MOV, WMV and AVI. it doesn't support DVD importing like most video editing software. To bring the DVD footage into After Effects CC/CS6 for editing, you'll need to convert DVD files to a fully compatible format, such as MOV/MPEG-2 for After Effects.
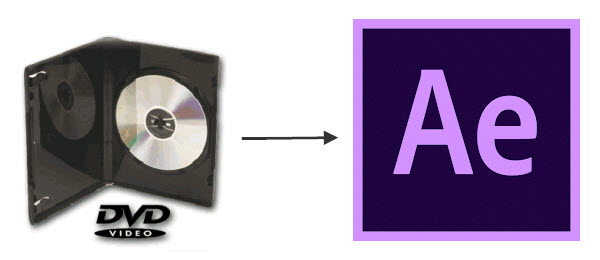 To get the clips off of DVD dics and into After Effects for editing, you'll need to convert your DVD footage into a format that works natively within AE. To finish the task, Dimo Video Converter Ultimate for Mac will be a great helper. With it, you can effortlessly convert your DVD files including DVD discs, Video_TS folder, ISO files for smoothly importing and editing in various non-linear editing systems (NLE), including After Effects, Adobe Premiere, Final Cut Pro, iMovie, Avid Media Composer and more.
Besides, the program also exports optimized presets for you to upload DVD to YouTube/Vimeo, stream DVD to PS4 Pro/Xbox One S, or to play DVD movies on iPad, iPhone, Android, Microsoft Surface RT/Pro, etc. Apart from that, its built-in editor allows you to adjust the video effects for better visual enjoyment and you can also download online videos from 300+ popular sites like YouTube, BBC, Vimeo, Facebook, etc. If you are running Windows computer, simply turn to Dimo Video Converter Ultimate which allows you to rip DVD to After Effects on Windows PC (including Windows 10). Now download the right version and follow the tips below to achieve your goal smoothly.
To get the clips off of DVD dics and into After Effects for editing, you'll need to convert your DVD footage into a format that works natively within AE. To finish the task, Dimo Video Converter Ultimate for Mac will be a great helper. With it, you can effortlessly convert your DVD files including DVD discs, Video_TS folder, ISO files for smoothly importing and editing in various non-linear editing systems (NLE), including After Effects, Adobe Premiere, Final Cut Pro, iMovie, Avid Media Composer and more.
Besides, the program also exports optimized presets for you to upload DVD to YouTube/Vimeo, stream DVD to PS4 Pro/Xbox One S, or to play DVD movies on iPad, iPhone, Android, Microsoft Surface RT/Pro, etc. Apart from that, its built-in editor allows you to adjust the video effects for better visual enjoyment and you can also download online videos from 300+ popular sites like YouTube, BBC, Vimeo, Facebook, etc. If you are running Windows computer, simply turn to Dimo Video Converter Ultimate which allows you to rip DVD to After Effects on Windows PC (including Windows 10). Now download the right version and follow the tips below to achieve your goal smoothly.
Free Download Dimo Video Converter Ultimate for Mac/Win:
How to Rip/Convert DVD to After Effects for editing
Step 1. Add DVD Movie
Launch DVD to AE Ripper and click "Add DVD" button to select the DVD files from your DVD disc, DVD folder, ISO image file to rip. Then loaded files will be displayed on the left source pane with titles listed. You can then select the audio track or subtitle you want to keep.
 Step 2. Choose the output format
To convert DVD files to After Effects, you can select Adobe Premiere from "Editor" as the output format. All output videos will keep the original quality of DVD video and seamlessly fit After Effects CC, CS6, CS5.5, CS5, CS4 and more. Also, you can follow the path "Format" > "Video" > "MOV" as output format, so that you can transcode DVD to H.264 .mov for AE editing smoothly.
Tip: Adjust video and audio settings
Click "Settings" button and customize proper video/audio parameters including Video size, bitrate and fame rate and more.
Step 2. Choose the output format
To convert DVD files to After Effects, you can select Adobe Premiere from "Editor" as the output format. All output videos will keep the original quality of DVD video and seamlessly fit After Effects CC, CS6, CS5.5, CS5, CS4 and more. Also, you can follow the path "Format" > "Video" > "MOV" as output format, so that you can transcode DVD to H.264 .mov for AE editing smoothly.
Tip: Adjust video and audio settings
Click "Settings" button and customize proper video/audio parameters including Video size, bitrate and fame rate and more.
 Step 3. Start converting DVD video to AE
Hit the "Start" button to begin the DVD to After Effects video conversion. Just wait for the process to finish. After that, you can get the converted videos and just open After Effects and import the converted videos for editing. It's just so easy to turn DVD to After Effects supported video formats in a few clicks! Just get the DVD ripper and enjoy DVD editing in After Effects CC, CS6, CS5.5, CS5, CS4.
Free Download or Purchase Dimo Video Converter Ultimate for Mac/Win:
Kindly Note:
The price of Dimo Video Converter Ultimate for Mac is divided into 1 Year Subscription, Lifetime/Family/Business License: $43.95/Year; $45.95/lifetime license; $95.95/family license(2-4 Macs); $189.95/business pack(5-8 Macs). Get your needed one at purchase page.
Contact us or leave a message at Facebook if you have any issues.
Related Articles:
Source: Rip and Import DVD into After Effects CC/CS6 for Editing
Step 3. Start converting DVD video to AE
Hit the "Start" button to begin the DVD to After Effects video conversion. Just wait for the process to finish. After that, you can get the converted videos and just open After Effects and import the converted videos for editing. It's just so easy to turn DVD to After Effects supported video formats in a few clicks! Just get the DVD ripper and enjoy DVD editing in After Effects CC, CS6, CS5.5, CS5, CS4.
Free Download or Purchase Dimo Video Converter Ultimate for Mac/Win:
Kindly Note:
The price of Dimo Video Converter Ultimate for Mac is divided into 1 Year Subscription, Lifetime/Family/Business License: $43.95/Year; $45.95/lifetime license; $95.95/family license(2-4 Macs); $189.95/business pack(5-8 Macs). Get your needed one at purchase page.
Contact us or leave a message at Facebook if you have any issues.
Related Articles:
Source: Rip and Import DVD into After Effects CC/CS6 for Editing
With ever-improving camera technology and storage solutions, the 4K industry has grown steadily since then. Today 4K has become a new standard in the video industry for high-budget feature films, TV dramas. If you got some 4K video from Sony F65, PMW-F55, PMW-F5 or other 4K cameras, you will be eagerly know the 4K video workflow. This article focuses on 4K Blu-ray/MXF/MP4/MOV/Prores video to iMovie workflow on MacOS Sierra.
 Actually, the 4K video was restricted to edit in iMovie. When you wanna import some 4K uncompressed videos in a MXF/MP4/MOV wrapper to iMovie for further editing, you will probably got some issues like program crashed, black viewer screen, no audio track... In fact, currently 4K videos still cannot be well supported by iMovie mainly because of the ultra high video resolution and the format compatibility problems. So how to work with 4K video in iMovie? The final solution is toencode 4K to iMovie compatible Apple InterMediate codec and even downscale 4K to 1080p to ensure the best results when using iMovie.
What you need is a 4K video converter application. Dimo Video Converter Ultimate for Mac is the ideal Mac 4K video converter for you, which can take your high quality 4K files and convert them into a supported format like AIC. mov for editing in iMovie any version. Besides iMovie, this software can also export professional encoders like DNxHD for Avid MC, Prores for FCP, MOV/MPEG-2 for Adobe Premiere Pro and more. This 4K video converter is also available to customize the output resolutions to any size like 1080p, 2K, 4K as the users want. For Windows users, 4K Video Converter is the alternative choice. Just download it and follow the tutorial below to get the work done.
Actually, the 4K video was restricted to edit in iMovie. When you wanna import some 4K uncompressed videos in a MXF/MP4/MOV wrapper to iMovie for further editing, you will probably got some issues like program crashed, black viewer screen, no audio track... In fact, currently 4K videos still cannot be well supported by iMovie mainly because of the ultra high video resolution and the format compatibility problems. So how to work with 4K video in iMovie? The final solution is toencode 4K to iMovie compatible Apple InterMediate codec and even downscale 4K to 1080p to ensure the best results when using iMovie.
What you need is a 4K video converter application. Dimo Video Converter Ultimate for Mac is the ideal Mac 4K video converter for you, which can take your high quality 4K files and convert them into a supported format like AIC. mov for editing in iMovie any version. Besides iMovie, this software can also export professional encoders like DNxHD for Avid MC, Prores for FCP, MOV/MPEG-2 for Adobe Premiere Pro and more. This 4K video converter is also available to customize the output resolutions to any size like 1080p, 2K, 4K as the users want. For Windows users, 4K Video Converter is the alternative choice. Just download it and follow the tutorial below to get the work done.
Free Download Dimo Video Converter Ultimate for Mac/Win:
Converting 4K video to work in iMovie
Step 1. Load original 4k files
Drag 4k files to the program directly. Or go to the "Add File" menu, choose "Add multi-files" or "Add Folder" to locate the 4k files you want to add. You can add several files to do batch conversion.
Step 2. Select the output format
You can choose Editor --> iMovie as the output format. The output format is designed for iMovie 11/iMovie 09/iMovie 08 specially.
Tip 1:
Click "Settings" to enter the parameters setting panel, you can set detailed parameters of audio and video like Video Codec, Bit Rate, Frame Rate, Resolution, and Audio Codec, Bit Rate, Sample Rate, Channels.
Tip 2:
Furthermore, you are provided some useful edit functions cropping, trimming, adding watermark, attaching subtitles for pre-editing your video files so that you can simplify your iMovie editing.
Step 3. Start 4K to iMovie conversion on Mac
Click the "Start" button to start the 4K to AIC conversion on MacOS Sierra.
Step 4. Import 4k into iMovie (11)
After the conversion, click "Open" to locate the result videos and then launch iMovie,choose File > Import > Movies..., to import converted 4K video into iMovie '11, iMovie 09, iMovie 08 and iMovie HD.
Free Download or Purchase Dimo Video Converter Ultimate for Mac/Win:
Kindly Note:
The price of Dimo Video Converter Ultimate for Mac is divided into 1 Year Subscription, Lifetime/Family/Business License: $43.95/Year; $45.95/lifetime license; $95.95/family license(2-4 Macs); $189.95/business pack(5-8 Macs). Get your needed one at purchase page.
Contact us or leave a message at Facebook if you have any issues.
Related Articles:
Source: How to Work With 4K Video in iMovie on MacOS Sierra